# Stijn Van Hulle
> Front-end engineer from Belgium and creator of Kubb, an open-source TypeScript tool for generating code from OpenAPI specs.
Canonical Origin: https://stijnvanhulle.be/
## LLM Resources
- [Full Content](https://stijnvanhulle.be/llms-full.txt): Complete page content in markdown format.
---
- **Page:** Stijn Van Hulle | Front-end engineer
- **Source:** https://stijnvanhulle.be/
- **Description:** Front-end engineer from Belgium. Creator of Kubb, an open-source TypeScript tool for generating code from OpenAPI specs.
```yaml
meta:
og:image: https://stijnvanhulle.be/_og/s/o_0ded7677ab897a42.png
og:image:height: "630"
og:image:type: image/png
og:image:width: "1200"
twitter:image: https://stijnvanhulle.be/_og/s/o_0ded7677ab897a42.png
```

# **Stijn Van Hulle **
$ Front-end engineerFront-end engineer
Senior Front-end engineer @ [Whale](https://usewhale.io)
Creator of [Kubb](https://www.kubb.dev)
[Belgium](https://www.google.com/maps/search/?api=1&query=Belgium)
[stijn@stijnvanhulle.be](mailto:stijn@stijnvanhulle.be)
[stijnvanhulle.be](https://stijnvanhulle.be)
[Github](https://github.com/stijnvanhulle) [Kubb Labs](https://github.com/kubb-labs) [LinkedIn](https://www.linkedin.com/in/stijnvanhulle) [Curriculum Vitae](https://stijnvanhulle.be/cv.pdf) [Instagram](https://www.instagram.com/stijnvanhulle)
**\#**
## **Hello**
Hi, I'm Stijn, a front-end engineer based in Belgium. I spend most of my time building product front ends with TypeScript, React, Next.js, Vue, and Nuxt.
I'm also the creator of Kubb, an open-source code generator for OpenAPI. I started it to avoid writing the same typed API clients by hand. It now takes up most of my open-source time. I also write about front-end work and the tools I'm using.
When I'm not coding, I travel with a camera in my bag. I enjoy seeing new places, learning about other cultures, and meeting people along the way.

#### **Kubb**
** Open source **
Kubb is where most of my spare coding time goes. Point it at a Swagger or OpenAPI spec and it writes the TypeScript types, clients, and hooks, so your front end and back end stay in step.
*Kubb turns this OpenAPI schema into a TypeScript type and a Zod schema.*
openapi.yaml
```
components: schemas: Pet: type: object required: [id, name] properties: id: { type: integer } name: { type: string }
```
gen/pet.ts
```
export type Pet = { id: number name: string}export const petSchema = z.object({ id: z.number().int(), name: z.string(),})
```
[**kubb.dev **](https://www.kubb.dev)
**\#**
## **Contributions**
[@stijnvanhulle →](https://github.com/stijnvanhulle)
10,804 contributions in the last year
NovDecJanFebMarAprMayJunJulAugSepOct
Less
More
**\#**
## **Projects**
[View all →](https://stijnvanhulle.be/projects)
[
**Kubb**
Define your API once and Kubb generates TypeScript types, clients, hooks, validators, and mocks from an OpenAPI specification.**#typescript**** #openapi**** #codegen**** #react-query**** #vue-query**** #zod**** #plugins**** #mcp**** #swr**** #axios**](https://stijnvanhulle.be/projects/kubb) [
**Agents**
Shared skills, rules, commands, subagents, and output styles for Claude Code, Cursor, and Codex, installable as a plugin.**#agents**** #claude**** #cursor**** #codex**** #skills**** #typescript**](https://stijnvanhulle.be/projects/agents) [
**Template**
A TypeScript monorepo starter with pnpm workspaces, Turborepo, oxlint, oxfmt, tsdown, Vitest, Changesets, and CI.**#typescript**** #monorepo**** #tooling**** #turbo**** #pnpm**** #vitest**** #changeset**** #github-actions**** #oxlint**** #claude**](https://stijnvanhulle.be/projects/template) [
**Scrum poker**
Planning poker cards for your phone, with rooms that put every vote, the story, and the team's questions on one shared screen.**#vue**** #nuxt**** #pwa**** #scrum**** #webrtc**](https://stijnvanhulle.be/projects/scrum-poker) [
**openapi-import**
Import an OpenAPI spec in TypeScript like any other file, with types, autocomplete, and errors from the spec and no generated files.**#typescript**** #openapi**** #kubb**** #content-mapper**](https://stijnvanhulle.be/projects/openapi-import)
**\#**
## **What I work with**
A short list of the languages, frameworks, and tools I use most.
[TypeScript](https://www.typescriptlang.org) [ JavaScript](https://developer.mozilla.org/en-US/docs/Web/JavaScript) [ HTML](https://developer.mozilla.org/en-US/docs/Web/HTML) [ CSS](https://developer.mozilla.org/en-US/docs/Web/CSS) [ Sass](https://sass-lang.com) [ SQL](https://en.wikipedia.org/wiki/SQL) [ React](https://react.dev) [ Vue](https://vuejs.org) [ Nuxt](https://nuxt.com) [ Next.js](https://nextjs.org) [ Node.js](https://nodejs.org) [ Redux](https://redux.js.org) [ Zustand](https://github.com/pmndrs/zustand) [ Zod](https://zod.dev) [ GraphQL](https://graphql.org) [ Tailwind CSS](https://tailwindcss.com) [ Styled Components](https://styled-components.com) [ jQuery](https://jquery.com) [ Meteor](https://www.meteor.com) [ Git](https://git-scm.com) [ Docker](https://www.docker.com) [ AWS](https://aws.amazon.com) [ GitLab](https://gitlab.com) [ Bitbucket](https://bitbucket.org) [ Jenkins](https://www.jenkins.io) [ OpenAPI](https://www.openapis.org) [ Swagger](https://swagger.io) [ Claude](https://www.anthropic.com/claude) [ Cursor](https://cursor.com)
**\#**
## **Experience**
#### **Senior Front-end Engineer ****Belgium (Gent)**

Whale
Aug 2026 – present
At Whale, I work on the front end of an AI platform for documenting processes and training teams. Whale is a Ghent-based SaaS company for small and medium-sized teams, where important process knowledge often lives with one person until they leave.
[**usewhale.io **](https://usewhale.io)
#### **Senior Front-end Engineer ****Belgium (Gent)**

Robovision
Nov 2025 – Aug 2026
As a front-end developer on Robovision's product team, I worked on the technical direction and feature delivery of its product suite with Vue.js. I used my previous experience to update the front-end architecture with tools such as Nx and TypeScript.
I also helped the team evaluate and integrate AI tools into its work.
[**www.robovision.ai **](https://www.robovision.ai)
**#typescript**** #vue**** #zod**** #sass**** #git**** #ai**** #gitlab**** #claude**** #cursor**** #llm**** #scrum**** #agile**
#### **Creator ****Belgium (Watervliet)**

Kubb
Dec 2022 – present
Kubb is an open-source framework for code generation and the project I spend most of my open-source time on. Point it at a Swagger or OpenAPI spec and it generates TypeScript types, clients, and hooks, so the front end and back end stay in sync. As its creator and maintainer, I guide the architecture, build and review plugins, write the documentation, and support its contributors and users.
[**www.kubb.dev **](https://www.kubb.dev)
**#typescript**** #openapi**** #swagger**** #code-generation**** #react**** #vue**** #zod**** #open-source**
#### **Front-end Lead ****Belgium (Brussels)**

Mediagenix
Dec 2021 – Nov 2025
After a year as a front-end developer on the product/hive team, I became front-end lead. I helped the team deliver projects on time and to a high standard, mentored team members through technical decisions, and reviewed their code.
I worked with stakeholders to discuss product direction and progress, decide what mattered most, and turn those decisions into work for the team.
Alongside managing the team, I kept our front-end practices current through industry events, training, and regular research. I documented our decisions and the reasoning behind our front-end architecture so the team could use them as a reference.
I also updated the stack with React, Jest, TypeScript, Ant Design, a monorepo structure, generated API clients, Zustand, and Zod. The changes gave the team a more consistent foundation as the products grew.
[**www.mediagenix.tv **](https://www.mediagenix.tv)
**#typescript**** #react**** #zod**** #zustand**** #sass**** #aws**** #git**** #docker**** #jenkins**** #scrum**** #agile**
**\#**
## **Blog**
[View all →](https://stijnvanhulle.be/blog)
[
**Import an OpenAPI spec in TypeScript**
**New ** Published on 23.10.2026](https://stijnvanhulle.be/blog/import-openapi-specs-in-typescript) [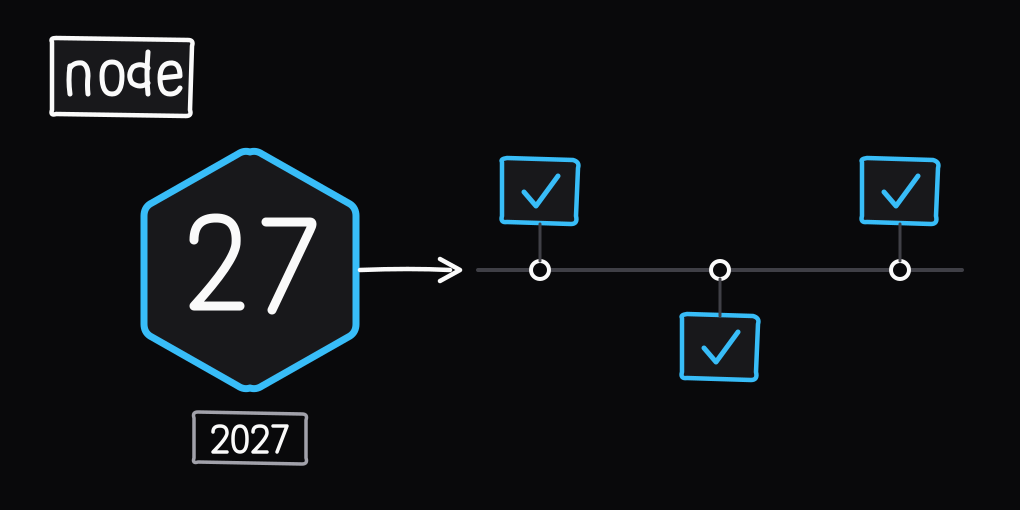
**Node version numbers now match the calendar year**
Published on 24.06.2026](https://stijnvanhulle.be/blog/node-release-schedule-change) [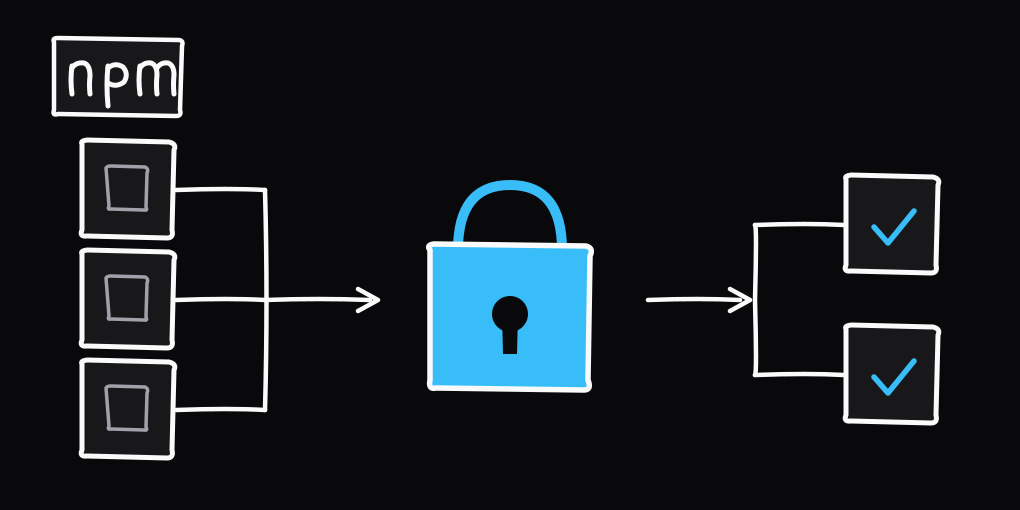
**Preventing npm supply chain attacks**
Published on 08.06.2026](https://stijnvanhulle.be/blog/preventing-npm-supply-chain-attacks) [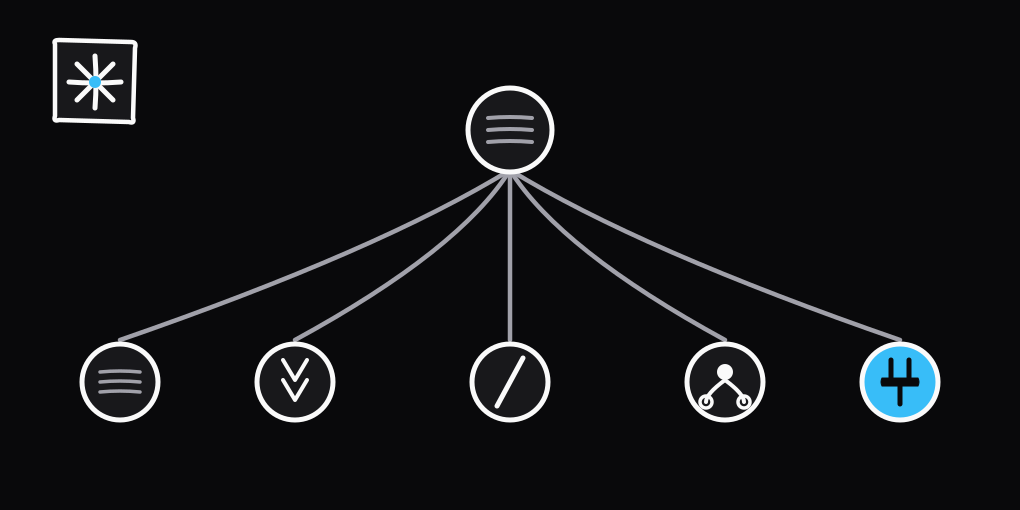
**Rules, skills, commands, subagents, MCP**
Published on 05.06.2026](https://stijnvanhulle.be/blog/rules-skills-commands-subagents) [
**Mapping data with Zod**
Published on 01.09.2024](https://stijnvanhulle.be/blog/mapping-of-data-with-zod)
**\#**
## **Sponsors**
[View all →](https://stijnvanhulle.be/sponsors)
Thanks to everyone who supports my open-source work. [Become a sponsor](https://github.com/sponsors/stijnvanhulle).
- [**CodeRabbit** $100/mo](https://github.com/coderabbitai)
- [**Claude** $100/mo](https://claude.com)
- [**Zendr** $10/mo](https://github.com/MKM-Group-AB)
- [**Matt Sutkowski** $10/mo](https://github.com/msutkowski)
- [**Volodymyr Kushnir** $10/mo](https://github.com/volodymyr-kushnir)
- [**Éric Le Maître** $5/mo](https://github.com/Ericlm)
- [**Denis Davydenko** $5/mo](https://github.com/denisdavydenko)
- [**Vanhoecke Vinnie** $5/mo](https://github.com/VinnieV)
- [**Colton Eakins** $5/mo](https://github.com/coltoneakins)
- [**Cipher** $1/mo](https://github.com/thefoxbun)
**\#**
## **Connect**
Feel free to contact me at [stijn@stijnvanhulle.be](mailto:stijn@stijnvanhulle.be)
[Github](https://github.com/stijnvanhulle) [Kubb Labs](https://github.com/kubb-labs) [LinkedIn](https://www.linkedin.com/in/stijnvanhulle) [Curriculum Vitae](https://stijnvanhulle.be/cv.pdf) [Instagram](https://www.instagram.com/stijnvanhulle)
```json
{"@context":"https://schema.org","@graph":[{"@id":"https://stijnvanhulle.be/#website","@type":"WebSite","description":"Front-end engineer from Belgium and creator of Kubb, an open-source TypeScript tool for OpenAPI code generation.","inLanguage":"en","name":"Stijn Van Hulle","url":"https://stijnvanhulle.be/","publisher":{"@id":"https://stijnvanhulle.be/#identity"}},{"@id":"https://stijnvanhulle.be/#webpage","description":"Front-end engineer from Belgium. Creator of Kubb, an open-source TypeScript tool for generating code from OpenAPI specs.","name":"Stijn Van Hulle","url":"https://stijnvanhulle.be/","@type":["WebPage","ProfilePage"],"about":{"@id":"https://stijnvanhulle.be/#identity"},"isPartOf":{"@id":"https://stijnvanhulle.be/#website"},"potentialAction":[{"@type":"ReadAction","target":["https://stijnvanhulle.be/"]}]},{"@id":"https://stijnvanhulle.be/#identity","@type":"Person","description":"Stijn Van Hulle is a front-end engineer from Belgium and the creator of Kubb, an open-source TypeScript tool for generating code from OpenAPI specs. He builds product front ends with React, Vue, and Nuxt.","jobTitle":"Senior Front-end Engineer","name":"Stijn Van Hulle","url":"https://stijnvanhulle.be","address":{"@type":"PostalAddress","addressCountry":"BE"},"image":{"@id":"https://stijnvanhulle.be/#/schema/image/1"},"knowsAbout":["TypeScript","JavaScript","React","Next.js","Vue","Nuxt","Node.js","Redux","Zustand","GraphQL","Zod","Sass","OpenAPI","Swagger","Code generation","REST APIs","Front-end architecture","Web development","Docker","AWS","Git","CI/CD","Open source","AI tooling","Large language models","Agile","Scrum"],"sameAs":["https://github.com/stijnvanhulle","https://www.linkedin.com/in/stijnvanhulle","https://x.com/stijnvanhulle","https://instagram.com/stijnvanhulle","https://www.kubb.dev"],"worksFor":[{"@type":"Organization","name":"Whale","url":"https://usewhale.io","logo":"https://stijnvanhulle.be/brands/whale.png","description":"SaaS company in Ghent building an AI platform for documenting processes, sharing knowledge, and training teams.","address":{"@type":"PostalAddress","addressLocality":"Ghent","addressCountry":"BE"},"sameAs":["https://usewhale.io","https://www.linkedin.com/company/usewhale/"]},{"@type":"Organization","name":"Kubb","url":"https://www.kubb.dev","logo":"https://kubb.dev/logo.png","email":"kubb@kubb.dev","description":"Generate types, clients, hooks, validators, and mocks from one OpenAPI specification.","sameAs":["https://github.com/kubb-labs/kubb","https://discord.gg/shfBFeczrm","https://www.linkedin.com/company/kubb-labs"]}]},{"@id":"https://stijnvanhulle.be/#/schema/image/1","@type":"ImageObject","contentUrl":"https://stijnvanhulle.be/avatar.png","inLanguage":"en","url":"https://stijnvanhulle.be/avatar.png"}]}
```
---
- **Page:** Sponsors | Stijn Van Hulle
- **Source:** https://stijnvanhulle.be/sponsors
- **Description:** The people and companies who support Stijn Van Hulle's open-source work on Kubb, Agents, and the TypeScript monorepo template.
```yaml
meta:
og:image: https://stijnvanhulle.be/_og/s/o_6bb5405a826e1881.png
og:image:height: "630"
og:image:type: image/png
og:image:width: "1200"
twitter:image: https://stijnvanhulle.be/_og/s/o_6bb5405a826e1881.png
```
**\#**
## **Sponsors**
# **People and companies who support my open-source work.**
Thanks to everyone who supports my open-source work. Sponsorship pays for the time I spend on three projects:
- [Kubb](https://stijnvanhulle.be/projects/kubb): generates types, clients, hooks, validators, and mocks from OpenAPI.
- [Agents](https://stijnvanhulle.be/projects/agents): shared skills and rules for Claude Code, Cursor, and Codex.
- [Template](https://stijnvanhulle.be/projects/template): a TypeScript monorepo starter with CI and releases set up.
Your support covers fixing bugs, answering issues, keeping dependencies current, and writing docs. All three are MIT licensed and free to use.
[**Become a sponsor **](https://github.com/sponsors/stijnvanhulle)
**\#**
## **Monthly sponsors**
- [**CodeRabbit** $100/mo](https://github.com/coderabbitai)
- [**Claude** $100/mo](https://claude.com)
- [**Zendr** $10/mo](https://github.com/MKM-Group-AB)
- [**Matt Sutkowski** $10/mo](https://github.com/msutkowski)
- [**Volodymyr Kushnir** $10/mo](https://github.com/volodymyr-kushnir)
- [**Éric Le Maître** $5/mo](https://github.com/Ericlm)
- [**Denis Davydenko** $5/mo](https://github.com/denisdavydenko)
- [**Vanhoecke Vinnie** $5/mo](https://github.com/VinnieV)
- [**Colton Eakins** $5/mo](https://github.com/coltoneakins)
- [**Cipher** $1/mo](https://github.com/thefoxbun)
```json
{"@context":"https://schema.org","@graph":[{"@id":"https://stijnvanhulle.be/#website","@type":"WebSite","description":"Front-end engineer from Belgium and creator of Kubb, an open-source TypeScript tool for OpenAPI code generation.","inLanguage":"en","name":"Stijn Van Hulle","url":"https://stijnvanhulle.be/","publisher":{"@id":"https://stijnvanhulle.be/#identity"}},{"@id":"https://stijnvanhulle.be/sponsors#webpage","@type":"WebPage","description":"The people and companies who support Stijn Van Hulle's open-source work on Kubb, Agents, and the TypeScript monorepo template.","name":"Sponsors","url":"https://stijnvanhulle.be/sponsors","breadcrumb":{"@id":"https://stijnvanhulle.be/sponsors#breadcrumb"},"isPartOf":{"@id":"https://stijnvanhulle.be/#website"},"potentialAction":[{"@type":"ReadAction","target":["https://stijnvanhulle.be/sponsors"]}]},{"@id":"https://stijnvanhulle.be/#identity","@type":"Person","description":"Stijn Van Hulle is a front-end engineer from Belgium and the creator of Kubb, an open-source TypeScript tool for generating code from OpenAPI specs. He builds product front ends with React, Vue, and Nuxt.","jobTitle":"Senior Front-end Engineer","name":"Stijn Van Hulle","url":"https://stijnvanhulle.be","address":{"@type":"PostalAddress","addressCountry":"BE"},"image":{"@id":"https://stijnvanhulle.be/#/schema/image/1"},"knowsAbout":["TypeScript","JavaScript","React","Next.js","Vue","Nuxt","Node.js","Redux","Zustand","GraphQL","Zod","Sass","OpenAPI","Swagger","Code generation","REST APIs","Front-end architecture","Web development","Docker","AWS","Git","CI/CD","Open source","AI tooling","Large language models","Agile","Scrum"],"sameAs":["https://github.com/stijnvanhulle","https://www.linkedin.com/in/stijnvanhulle","https://x.com/stijnvanhulle","https://instagram.com/stijnvanhulle","https://www.kubb.dev"],"worksFor":[{"@type":"Organization","name":"Whale","url":"https://usewhale.io","logo":"https://stijnvanhulle.be/brands/whale.png","description":"SaaS company in Ghent building an AI platform for documenting processes, sharing knowledge, and training teams.","address":{"@type":"PostalAddress","addressLocality":"Ghent","addressCountry":"BE"},"sameAs":["https://usewhale.io","https://www.linkedin.com/company/usewhale/"]},{"@type":"Organization","name":"Kubb","url":"https://www.kubb.dev","logo":"https://kubb.dev/logo.png","email":"kubb@kubb.dev","description":"Generate types, clients, hooks, validators, and mocks from one OpenAPI specification.","sameAs":["https://github.com/kubb-labs/kubb","https://discord.gg/shfBFeczrm","https://www.linkedin.com/company/kubb-labs"]}]},{"@id":"https://stijnvanhulle.be/sponsors#breadcrumb","@type":"BreadcrumbList","itemListElement":[{"@type":"ListItem","name":"Home","item":"https://stijnvanhulle.be","position":1},{"@type":"ListItem","name":"Sponsors","item":"https://stijnvanhulle.be/sponsors","position":2}]},{"@id":"https://stijnvanhulle.be/#/schema/image/1","@type":"ImageObject","contentUrl":"https://stijnvanhulle.be/avatar.png","inLanguage":"en","url":"https://stijnvanhulle.be/avatar.png"}]}
```
---
- **Page:** Scrum poker | Stijn Van Hulle
- **Source:** https://stijnvanhulle.be/scrum
- **Description:** Planning poker cards for your phone or laptop. Pick an estimate, keep it face-down, and tap or shake to reveal it to the team.
```yaml
meta:
og:image: https://stijnvanhulle.be/_og/s/o_25634b47d66a5ed1.png
og:image:height: "630"
og:image:type: image/png
og:image:width: "1200"
twitter:image: https://stijnvanhulle.be/_og/s/o_25634b47d66a5ed1.png
```
**\#**
## **Scrum poker**
-
-
-
-
-
-
-
-
-
-
```json
{"@context":"https://schema.org","@graph":[{"@id":"https://stijnvanhulle.be/#website","@type":"WebSite","description":"Front-end engineer from Belgium and creator of Kubb, an open-source TypeScript tool for OpenAPI code generation.","inLanguage":"en","name":"Stijn Van Hulle","url":"https://stijnvanhulle.be/","publisher":{"@id":"https://stijnvanhulle.be/#identity"}},{"@id":"https://stijnvanhulle.be/scrum#webpage","@type":"WebPage","description":"Planning poker cards for your phone or laptop. Pick an estimate, keep it face-down, and tap or shake to reveal it to the team.","name":"Scrum poker","url":"https://stijnvanhulle.be/scrum","breadcrumb":{"@id":"https://stijnvanhulle.be/scrum#breadcrumb"},"isPartOf":{"@id":"https://stijnvanhulle.be/#website"},"potentialAction":[{"@type":"ReadAction","target":["https://stijnvanhulle.be/scrum"]}]},{"@id":"https://stijnvanhulle.be/#identity","@type":"Person","description":"Stijn Van Hulle is a front-end engineer from Belgium and the creator of Kubb, an open-source TypeScript tool for generating code from OpenAPI specs. He builds product front ends with React, Vue, and Nuxt.","jobTitle":"Senior Front-end Engineer","name":"Stijn Van Hulle","url":"https://stijnvanhulle.be","address":{"@type":"PostalAddress","addressCountry":"BE"},"image":{"@id":"https://stijnvanhulle.be/#/schema/image/1"},"knowsAbout":["TypeScript","JavaScript","React","Next.js","Vue","Nuxt","Node.js","Redux","Zustand","GraphQL","Zod","Sass","OpenAPI","Swagger","Code generation","REST APIs","Front-end architecture","Web development","Docker","AWS","Git","CI/CD","Open source","AI tooling","Large language models","Agile","Scrum"],"sameAs":["https://github.com/stijnvanhulle","https://www.linkedin.com/in/stijnvanhulle","https://x.com/stijnvanhulle","https://instagram.com/stijnvanhulle","https://www.kubb.dev"],"worksFor":[{"@type":"Organization","name":"Whale","url":"https://usewhale.io","logo":"https://stijnvanhulle.be/brands/whale.png","description":"SaaS company in Ghent building an AI platform for documenting processes, sharing knowledge, and training teams.","address":{"@type":"PostalAddress","addressLocality":"Ghent","addressCountry":"BE"},"sameAs":["https://usewhale.io","https://www.linkedin.com/company/usewhale/"]},{"@type":"Organization","name":"Kubb","url":"https://www.kubb.dev","logo":"https://kubb.dev/logo.png","email":"kubb@kubb.dev","description":"Generate types, clients, hooks, validators, and mocks from one OpenAPI specification.","sameAs":["https://github.com/kubb-labs/kubb","https://discord.gg/shfBFeczrm","https://www.linkedin.com/company/kubb-labs"]}]},{"@id":"https://stijnvanhulle.be/scrum#breadcrumb","@type":"BreadcrumbList","itemListElement":[{"@type":"ListItem","name":"Home","item":"https://stijnvanhulle.be","position":1},{"@type":"ListItem","name":"Scrum poker","item":"https://stijnvanhulle.be/scrum","position":2}]},{"@id":"https://stijnvanhulle.be/#/schema/image/1","@type":"ImageObject","contentUrl":"https://stijnvanhulle.be/avatar.png","inLanguage":"en","url":"https://stijnvanhulle.be/avatar.png"}]}
```
---
- **Page:** Blog | Stijn Van Hulle
- **Source:** https://stijnvanhulle.be/blog
- **Description:** Notes by Stijn Van Hulle on front-end work, TypeScript, Vue, Nuxt, React, OpenAPI, and Kubb.
```yaml
meta:
og:image: https://stijnvanhulle.be/_og/s/o_17e9bbf262fb48cd.png
og:image:height: "630"
og:image:type: image/png
og:image:width: "1200"
twitter:image: https://stijnvanhulle.be/_og/s/o_17e9bbf262fb48cd.png
```
**\#**
## **Blog**
# **Notes on front-end work, TypeScript, and Kubb.**
[
**Import an OpenAPI spec in TypeScript**
**New ** Published on 23.10.2026](https://stijnvanhulle.be/blog/import-openapi-specs-in-typescript) [
**Node version numbers now match the calendar year**
Published on 24.06.2026](https://stijnvanhulle.be/blog/node-release-schedule-change) [
**Preventing npm supply chain attacks**
Published on 08.06.2026](https://stijnvanhulle.be/blog/preventing-npm-supply-chain-attacks) [
**Rules, skills, commands, subagents, MCP**
Published on 05.06.2026](https://stijnvanhulle.be/blog/rules-skills-commands-subagents) [
**Mapping data with Zod**
Published on 01.09.2024](https://stijnvanhulle.be/blog/mapping-of-data-with-zod)
```json
{"@context":"https://schema.org","@graph":[{"@id":"https://stijnvanhulle.be/#website","@type":"WebSite","description":"Front-end engineer from Belgium and creator of Kubb, an open-source TypeScript tool for OpenAPI code generation.","inLanguage":"en","name":"Stijn Van Hulle","url":"https://stijnvanhulle.be/","publisher":{"@id":"https://stijnvanhulle.be/#identity"}},{"@id":"https://stijnvanhulle.be/blog#webpage","description":"Notes by Stijn Van Hulle on front-end work, TypeScript, Vue, Nuxt, React, OpenAPI, and Kubb.","name":"Blog","url":"https://stijnvanhulle.be/blog","@type":["WebPage","CollectionPage"],"breadcrumb":{"@id":"https://stijnvanhulle.be/blog#breadcrumb"},"isPartOf":{"@id":"https://stijnvanhulle.be/#website"},"potentialAction":[{"@type":"ReadAction","target":["https://stijnvanhulle.be/blog"]}]},{"@id":"https://stijnvanhulle.be/#identity","@type":"Person","description":"Stijn Van Hulle is a front-end engineer from Belgium and the creator of Kubb, an open-source TypeScript tool for generating code from OpenAPI specs. He builds product front ends with React, Vue, and Nuxt.","jobTitle":"Senior Front-end Engineer","name":"Stijn Van Hulle","url":"https://stijnvanhulle.be","address":{"@type":"PostalAddress","addressCountry":"BE"},"image":{"@id":"https://stijnvanhulle.be/#/schema/image/1"},"knowsAbout":["TypeScript","JavaScript","React","Next.js","Vue","Nuxt","Node.js","Redux","Zustand","GraphQL","Zod","Sass","OpenAPI","Swagger","Code generation","REST APIs","Front-end architecture","Web development","Docker","AWS","Git","CI/CD","Open source","AI tooling","Large language models","Agile","Scrum"],"sameAs":["https://github.com/stijnvanhulle","https://www.linkedin.com/in/stijnvanhulle","https://x.com/stijnvanhulle","https://instagram.com/stijnvanhulle","https://www.kubb.dev"],"worksFor":[{"@type":"Organization","name":"Whale","url":"https://usewhale.io","logo":"https://stijnvanhulle.be/brands/whale.png","description":"SaaS company in Ghent building an AI platform for documenting processes, sharing knowledge, and training teams.","address":{"@type":"PostalAddress","addressLocality":"Ghent","addressCountry":"BE"},"sameAs":["https://usewhale.io","https://www.linkedin.com/company/usewhale/"]},{"@type":"Organization","name":"Kubb","url":"https://www.kubb.dev","logo":"https://kubb.dev/logo.png","email":"kubb@kubb.dev","description":"Generate types, clients, hooks, validators, and mocks from one OpenAPI specification.","sameAs":["https://github.com/kubb-labs/kubb","https://discord.gg/shfBFeczrm","https://www.linkedin.com/company/kubb-labs"]}]},{"@id":"https://stijnvanhulle.be/blog#breadcrumb","@type":"BreadcrumbList","itemListElement":[{"@type":"ListItem","name":"Home","item":"https://stijnvanhulle.be","position":1},{"@type":"ListItem","name":"Blog","item":"https://stijnvanhulle.be/blog","position":2}]},{"@id":"https://stijnvanhulle.be/#/schema/image/1","@type":"ImageObject","contentUrl":"https://stijnvanhulle.be/avatar.png","inLanguage":"en","url":"https://stijnvanhulle.be/avatar.png"}]}
```
---
- **Page:** Projects | Stijn Van Hulle
- **Source:** https://stijnvanhulle.be/projects
- **Description:** Open-source projects by Stijn Van Hulle, including Kubb and a TypeScript monorepo starter.
```yaml
meta:
og:image: https://stijnvanhulle.be/_og/s/o_46b4190a029b07ce.png
og:image:height: "630"
og:image:type: image/png
og:image:width: "1200"
twitter:image: https://stijnvanhulle.be/_og/s/o_46b4190a029b07ce.png
```
**\#**
## **Projects**
# **Open-source work, including Kubb and a TypeScript starter.**
[
**Kubb**
Define your API once and Kubb generates TypeScript types, clients, hooks, validators, and mocks from an OpenAPI specification.**#typescript**** #openapi**** #codegen**** #react-query**** #vue-query**** #zod**** #plugins**** #mcp**** #swr**** #axios**](https://stijnvanhulle.be/projects/kubb) [
**Agents**
Shared skills, rules, commands, subagents, and output styles for Claude Code, Cursor, and Codex, installable as a plugin.**#agents**** #claude**** #cursor**** #codex**** #skills**** #typescript**](https://stijnvanhulle.be/projects/agents) [
**Template**
A TypeScript monorepo starter with pnpm workspaces, Turborepo, oxlint, oxfmt, tsdown, Vitest, Changesets, and CI.**#typescript**** #monorepo**** #tooling**** #turbo**** #pnpm**** #vitest**** #changeset**** #github-actions**** #oxlint**** #claude**](https://stijnvanhulle.be/projects/template) [
**Scrum poker**
Planning poker cards for your phone, with rooms that put every vote, the story, and the team's questions on one shared screen.**#vue**** #nuxt**** #pwa**** #scrum**** #webrtc**](https://stijnvanhulle.be/projects/scrum-poker) [
**openapi-import**
Import an OpenAPI spec in TypeScript like any other file, with types, autocomplete, and errors from the spec and no generated files.**#typescript**** #openapi**** #kubb**** #content-mapper**](https://stijnvanhulle.be/projects/openapi-import)
```json
{"@context":"https://schema.org","@graph":[{"@id":"https://stijnvanhulle.be/#website","@type":"WebSite","description":"Front-end engineer from Belgium and creator of Kubb, an open-source TypeScript tool for OpenAPI code generation.","inLanguage":"en","name":"Stijn Van Hulle","url":"https://stijnvanhulle.be/","publisher":{"@id":"https://stijnvanhulle.be/#identity"}},{"@id":"https://stijnvanhulle.be/projects#webpage","description":"Open-source projects by Stijn Van Hulle, including Kubb and a TypeScript monorepo starter.","name":"Projects","url":"https://stijnvanhulle.be/projects","@type":["WebPage","CollectionPage"],"breadcrumb":{"@id":"https://stijnvanhulle.be/projects#breadcrumb"},"isPartOf":{"@id":"https://stijnvanhulle.be/#website"},"potentialAction":[{"@type":"ReadAction","target":["https://stijnvanhulle.be/projects"]}]},{"@id":"https://stijnvanhulle.be/#identity","@type":"Person","description":"Stijn Van Hulle is a front-end engineer from Belgium and the creator of Kubb, an open-source TypeScript tool for generating code from OpenAPI specs. He builds product front ends with React, Vue, and Nuxt.","jobTitle":"Senior Front-end Engineer","name":"Stijn Van Hulle","url":"https://stijnvanhulle.be","address":{"@type":"PostalAddress","addressCountry":"BE"},"image":{"@id":"https://stijnvanhulle.be/#/schema/image/1"},"knowsAbout":["TypeScript","JavaScript","React","Next.js","Vue","Nuxt","Node.js","Redux","Zustand","GraphQL","Zod","Sass","OpenAPI","Swagger","Code generation","REST APIs","Front-end architecture","Web development","Docker","AWS","Git","CI/CD","Open source","AI tooling","Large language models","Agile","Scrum"],"sameAs":["https://github.com/stijnvanhulle","https://www.linkedin.com/in/stijnvanhulle","https://x.com/stijnvanhulle","https://instagram.com/stijnvanhulle","https://www.kubb.dev"],"worksFor":[{"@type":"Organization","name":"Whale","url":"https://usewhale.io","logo":"https://stijnvanhulle.be/brands/whale.png","description":"SaaS company in Ghent building an AI platform for documenting processes, sharing knowledge, and training teams.","address":{"@type":"PostalAddress","addressLocality":"Ghent","addressCountry":"BE"},"sameAs":["https://usewhale.io","https://www.linkedin.com/company/usewhale/"]},{"@type":"Organization","name":"Kubb","url":"https://www.kubb.dev","logo":"https://kubb.dev/logo.png","email":"kubb@kubb.dev","description":"Generate types, clients, hooks, validators, and mocks from one OpenAPI specification.","sameAs":["https://github.com/kubb-labs/kubb","https://discord.gg/shfBFeczrm","https://www.linkedin.com/company/kubb-labs"]}]},{"@id":"https://stijnvanhulle.be/projects#breadcrumb","@type":"BreadcrumbList","itemListElement":[{"@type":"ListItem","name":"Home","item":"https://stijnvanhulle.be","position":1},{"@type":"ListItem","name":"Projects","item":"https://stijnvanhulle.be/projects","position":2}]},{"@id":"https://stijnvanhulle.be/#/schema/image/1","@type":"ImageObject","contentUrl":"https://stijnvanhulle.be/avatar.png","inLanguage":"en","url":"https://stijnvanhulle.be/avatar.png"}]}
```
---
- **Page:** Import an OpenAPI spec in TypeScript
- **Source:** https://stijnvanhulle.be/blog/import-openapi-specs-in-typescript
- **Description:** OpenAPI describes your API, but the types usually come from a code generator. With openapi-import and TypeScript 7.1, you import the spec like any other file and get the types without generated files.
An [OpenAPI](https://www.openapis.org/) spec already describes your whole API. Yet before TypeScript knows any of it, most projects run a generator and commit a folder of output. [`openapi-import`](https://stijnvanhulle.be/projects/openapi-import) drops that step. You import the spec, and TypeScript reads the types from it:
```ts
import type { Pet } from './petStore.openapi.yaml'
```
## What OpenAPI gives you
An OpenAPI document is a YAML or JSON file with three parts that matter for a front end:
- `paths`: the endpoints, their methods, parameters, and responses.
- `components.schemas`: the data shapes, such as `Pet` or `Order`.
- `servers`: the base URLs.
```yaml [petStore.openapi.yaml]
openapi: 3.1.0
info:
title: Pet Store
version: 1.0.0
paths:
/pets/{petId}:
get:
operationId: getPetById
parameters:
- name: petId
in: path
required: true
schema:
type: integer
responses:
'200':
description: A pet
content:
application/json:
schema:
$ref: '#/components/schemas/Pet'
components:
schemas:
Pet:
type: object
required: [id, name]
properties:
id:
type: integer
name:
type: string
status:
type: string
enum: [available, pending, sold]
```
Back end and front end both build against this file. If your types drift from it, you find out at run time, usually from a bug report.
## Why generated files get in the way
Tools such as [Kubb](https://stijnvanhulle.be/projects/kubb) turn a spec into TypeScript types, Zod schemas, and clients. I have built Kubb around that idea for years. It works, but the output is a second copy of the spec, and copies drift:
- You run the generator every time the spec changes, or the types go stale.
- You choose between committing the files and generating them in CI.
- Go to definition lands in generated code, not in the spec.
## Import the spec instead
TypeScript 7.1 adds content mappers. A content mapper is a package that tells the compiler how to read a file type it does not know. `openapi-import` is a content mapper for OpenAPI. Install it with Kubb and the TypeScript beta:
```bash [Terminal]
pnpm add -D kubb openapi-import typescript@beta
```
Name your spec `.openapi.yaml` and register that extension in `tsconfig.json`:
```json [tsconfig.json]
{
"contentMappers": [
{
"package": "openapi-import",
"extensions": [".openapi.yaml", ".openapi.yml"]
}
]
}
```
Now the spec is a module. Import a schema type and use it:
```ts [pets.ts]
import type { Pet } from './petStore.openapi.yaml'
const pet: Pet = {
id: 1,
name: 'Rex',
status: 'lost', // Type '"lost"' is not assignable to type '"available" | "pending" | "sold"'.
}
```
The editor autocompletes `status` from the enum in the spec and flags `'lost'` as an error. Hover shows the `Pet` type, and go to definition jumps to `Pet` in the YAML. Rename the type and the key in the spec follows. That last one still surprises me every time.
## Add Zod schemas
Without a config, `openapi-import` gives you the types from Kubb's `pluginTs`. Add a `kubb.config.ts` to get the output of more plugins, such as Zod schemas, from the same import:
```ts [kubb.config.ts]
import { defineConfig } from 'kubb/config'
import { pluginTs } from '@kubb/plugin-ts'
import { pluginZod } from '@kubb/plugin-zod'
export default defineConfig({
output: { path: './src/gen' },
plugins: [pluginTs(), pluginZod()],
})
```
```ts [pets.ts]
import { type Pet, petSchema } from './petStore.openapi.yaml'
const response = await fetch('https://petstore3.swagger.io/api/v3/pet/1')
const pet: Pet = petSchema.parse(await response.json())
```
The types come from the content mapper. The code that runs comes from [`unplugin-kubb`](https://www.npmjs.com/package/unplugin-kubb), which loads the same module in Vite, webpack, Rollup, and other bundlers.
## Check it in CI
The editor and the build use the same compiler, so CI reports the same errors you see while typing:
```bash [Terminal]
tsc --runExternalCode
```
When someone changes the spec, every file that no longer matches it fails the type check, before the code ships.
## Get started
Install `openapi-import`, add one entry to `contentMappers`, and import your `*.openapi.yaml` spec. The [project page](https://stijnvanhulle.be/projects/openapi-import) has a demo, and the [repository](https://github.com/kubb-labs/openapi-import) takes issues and feedback.
---
- **Page:** Mapping data with Zod
- **Source:** https://stijnvanhulle.be/blog/mapping-of-data-with-zod
- **Description:** Use Zod to validate and reshape data from different sources with TypeScript.
## The problem
Mapping data in JavaScript and TypeScript is not always straightforward. You may need a series of checks or switch statements to determine which shape the input has, then write validation for each shape.
Getting the types right adds another layer of work. The usual tricks can make the mapper harder to understand and maintain.
The result is a lot of code around a fairly simple job. [Zod](https://zod.dev/) can handle the validation while you map the data.
```typescript
const user = {
id: '123',
firstName: 'Stijn',
lastName: 'Van Hulle',
email: 'stijn@stijnvanhulle.be',
} as const
const twitterUser = {
id: '123',
first: 'Stijn',
last: 'Van Hulle',
email: 'stijn@stijnvanhulle.be',
} as const
const googleUser = {
uuid: '123',
info: {
firstName: 'Stijn',
lastName: 'Van Hulle',
},
email: 'stijn@stijnvanhulle.be',
} as const
// no type support
const mapData = (data: any) => {
if (data.info) {
// google user
return {
id: user.uuid,
value: user.info.firstName + ' ' + user.info.lastName,
}
} else if (data.first && data.last) {
return {
id: user.id,
value: user.first + ' ' + user.last,
}
} else if (data.firstName && data.lastName) {
return {
id: user.id,
value: user.firstName + ' ' + user.lastName,
}
}
}
mapData(googleUser) /* => {
id: '123',
value: 'Stijn Van Hulle'
}
*/
```
## What is Zod?
Zod describes itself as "TypeScript-first schema validation with static type inference."
You can use Zod to validate forms, define schemas, and validate API input. [tRPC](https://trpc.io/) is one example of a library that uses Zod. Define a schema on the back end, then reuse it on the front end when making API calls.
There are many TypeScript [schema validation libraries](https://zod.dev/?id=comparison), but Zod also infers TypeScript types from your schemas. That makes it a good fit for a typed data mapper.
### Zod primitives
The following example checks whether a value is a string.
```typescript
import { z } from 'zod'
// creating a schema for strings
const mySchema = z.string()
// parsing
mySchema.parse('tuna') // => "tuna"
mySchema.parse(12) // => throws ZodError
// "safe" parsing (doesn't throw error if validation fails)
mySchema.safeParse('tuna') // => { success: true; data: "tuna" }
mySchema.safeParse(12) // => { success: false; error: ZodError }
```
### Zod object
Zod can also validate objects against a defined shape.
```typescript
import { z } from 'zod'
const User = z.object({
username: z.string(),
})
User.parse({ username: 'Ludwig' })
// extract the inferred type
type User = z.infer
// { username: string }
User.parse({ firstname: 'firstname' }) // => throws ZodError
```
### Zod transform
Zod can transform a value from one shape into another. This example extracts the domain from an email address.
```typescript
const emailToDomain = z
.string()
.email()
.transform((val) => val.split('@')[1])
emailToDomain.parse('colinhacks@example.com') // => example.com
```
## Mapping data
### Simple Zod mapper
With the basics in place, we can build a mapper schema using Zod primitives and `transform`.
1. Start with an input object and map it to an object containing only *id* and *value* (the user's full name).
```typescript
const user = {
id: '123',
firstName: 'Stijn',
lastName: 'Van Hulle',
email: 'stijn@stijnvanhulle.be',
}
```
1. Use `transform` to create the mapped object.
```typescript
import z from 'zod'
export const userSchema = z
.object({
id: z.string(),
firstName: z.string(),
lastName: z.string(),
email: z.string(),
})
.transform((user) => {
return {
id: user.id,
value: user.firstName + ' ' + user.lastName,
}
})
```
1. Call `.parse` with *user*. It returns the mapped data.
```typescript
userSchema.parse(user) /* => {
id: '123',
value: 'Stijn Van Hulle'
}
*/
```
### Multiple inputs mapper
What if the inputs have different shapes and schemas?
```typescript
import z from 'zod'
const user = {
id: '123',
firstName: 'Stijn',
lastName: 'Van Hulle',
email: 'stijn@stijnvanhulle.be',
}
const twitterUser = {
id: '123',
first: 'Stijn',
last: 'Van Hulle',
email: 'stijn@stijnvanhulle.be',
}
export const userSchema = z
.object({
id: z.string(),
firstName: z.string(),
lastName: z.string(),
email: z.string(),
})
.transform((user) => {
return {
id: user.id,
value: user.firstName + ' ' + user.lastName,
}
})
export const twitterUserSchema = z
.object({
id: z.string(),
first: z.string(),
last: z.string(),
email: z.string(),
})
.transform((user) => {
return {
id: user.id,
value: user.first + ' ' + user.last,
}
})
userSchema.parse(user) /* => {
id: '123',
value: 'Stijn Van Hulle'
}
*/
twitterUserSchema.parse(twitterUser) /* => {
id: '123',
value: 'Stijn Van Hulle'
}
*/
```
### Multiple unknown inputs mapper
What if the input shape is unknown?
Let's say we have 2 API calls:
- One to our database
- One to an external API(for example Twitter).
We could check where the data came from, but that brings back the same maintenance problem. We would still need conditional logic to inspect the input before converting it.
```typescript
import z from 'zod'
const user = {
id: '123',
firstName: 'Stijn',
lastName: 'Van Hulle',
email: 'stijn@stijnvanhulle.be',
}
const twitterUser = {
id: '123',
first: 'Stijn',
last: 'Van Hulle',
email: 'stijn@stijnvanhulle.be',
}
export const userSchema = z
.object({
id: z.string(),
firstName: z.string(),
lastName: z.string(),
email: z.string(),
})
.transform((user) => {
return {
id: user.id,
value: user.firstName + ' ' + user.lastName,
}
})
export const twitterUserSchema = z
.object({
id: z.string(),
first: z.string(),
last: z.string(),
email: z.string(),
})
.transform((user) => {
return {
id: user.id,
value: user.first + ' ' + user.last,
}
})
const mapData = (data: any) => {
if (data.first) {
// twitter
twitterUserSchema.parse(data)
} else {
// database user
return userSchema.parse(data)
}
}
mapData(twitteruser) /* => {
id: '123',
value: 'Stijn Van Hulle'
}
*/
mapData(user) /* => {
id: '123',
value: 'Stijn Van Hulle'
}
*/
```
### Zod unions
This works for two sources, but what happens when a third source appears, such as Google user data? Adding another conditional would make the mapper grow with every source.
Instead, let Zod try each schema and infer the matching output type.
Zod unions, including the `.or` method, let you describe these alternatives in one schema.
```typescript
const schema = z.string().or(z.number()) // string | number
// equivalent to
z.union([z.string(), z.number()])
stringOrNumber.parse('foo') // passes
stringOrNumber.parse(14) // passes
```
### End result
Combine unions with transforms, and Zod can find the matching schema and return one consistent shape.
So with our previous example, we can simplify that to the following:
```typescript
const user = {
id: '123',
firstName: 'Stijn',
lastName: 'Van Hulle',
email: 'stijn@stijnvanhulle.be',
} as const
const twitterUser = {
id: '123',
first: 'Stijn',
last: 'Van Hulle',
email: 'stijn@stijnvanhulle.be',
} as const
const googleUser = {
uuid: '123',
info: {
firstName: 'Stijn',
lastName: 'Van Hulle',
},
email: 'stijn@stijnvanhulle.be',
} as const
```
```typescript
import z from 'zod'
export const userSchema = z
.object({
id: z.string(),
firstName: z.string(),
lastName: z.string(),
email: z.string(),
})
.transform((user) => {
return {
id: user.id,
value: user.firstName + ' ' + user.lastName,
}
})
export const twitterUserSchema = z
.object({
id: z.string(),
first: z.string(),
last: z.string(),
email: z.string(),
})
.transform((user) => {
return {
id: user.id,
value: user.first + ' ' + user.last,
}
})
export const googleUserSchema = z
.object({
uuid: z.string(),
info: z.object({
firstName: z.string(),
lastName: z.string(),
}),
email: z.string(),
})
.transform((user) => {
return {
id: user.uuid,
value: user.info.firstName + ' ' + user.info.lastName,
}
})
```
```typescript
const mapData = (data: any) => twitterUserSchema.or(userSchema).or(googleUserSchema).parse(data)
export const users = [mapData(twitterUser), mapData(user), mapData(googleUser)]
```
[](https://codesandbox.io/s/jovial-worker-dl978e?fontsize=14&hidenavigation=1&theme=dark)
### Summary
You can add as many non-overlapping schemas as you need. Zod throws an error when none matches the input, while the result keeps a consistent type.
This approach is useful for mapping JavaScript data, but keep the mapper easy to follow. Too many schemas and types make an application harder to maintain, so add a union only when it reflects a real input source.
Zod can do much more, so explore the library when you need it. For a deeper look, see [this Zod tutorial](https://www.totaltypescript.com/tutorials/zod).
---
- **Page:** Node version numbers now match the calendar year
- **Source:** https://stijnvanhulle.be/blog/node-release-schedule-change
- **Description:** Starting with Node 27, the major version number tracks the calendar year it ships in. The number alone tells you when a line shipped and when it reaches end of life.
Node.js [changed its release schedule](https://nodejs.org/en/blog/announcements/evolving-the-nodejs-release-schedule) for the first time in about ten years. The part that touches daily work most is the version number: starting with Node 27, the major version matches the calendar year it ships in.
## What changes
Node moves from two major releases a year to one, every April, promoted to LTS that October. The major number is the year minus 2000, so Node 27 ships in 2027 and Node 28 in 2028.
Each line opens as an alpha six months early. Node 27 lands as `27.0.0-alpha.1` in October 2026, takes its semver-major changes there, ships as `27.0.0` in April 2027, and goes LTS that October. Node 26 is the last release numbered the old way.
Release schedule from Node 27
Node
27
alpha
Current
LTS · 30 months
Node
28
alpha
Current
LTS · 30 months
Node
29
alpha
Current
LTS · 30 months
2026
2027
2028
2029
2030
2031
2032
2033
One line a year, and the major number is the year it ships. Six months as Current, then 30 months of LTS: 36 months from release to end of life.
## The number is the year
Quick: what year did Node 18 ship? I can never remember, and most people cannot either. Today, the major version is just a counter, so it says little about a runtime's age. [Ubuntu](https://ubuntu.com) solved this years ago: `24.04` reads as April 2024 at a glance, and Node will now do the same.
A small piece of luck makes the switch clean. Today's major, 26, already matches the year, 2026. Moving to exactly one release a year keeps them locked together from here: 27 in 2027, 28 in 2028.
The number also carries the support window. Node 27 is a 2027 line, so it reaches end of life in April 2030: six months as Current from April 2027, then 30 months of LTS, 36 months in total. Read the year off the major, add that fixed window, and you have the dates without a calendar.
That sounds cosmetic until you write the upgrade ticket. "We're three majors behind" used to be vague, because odd-numbered lines like 21 and 23 never reached LTS and most teams skipped them, so a gap in major numbers did not map to time. Now three majors behind is three years behind, and everyone reads the number the same way.
## The number shows up everywhere
The version number lands in every `engines` range, every CI matrix, and every "which Node are we on" conversation. Once it carries the year, each of those reads as a date instead of an arbitrary count. No cross-referencing a release calendar to work out what a number means.
It is a small, boring change, which is exactly what I want from a versioning scheme. You no longer need to track the schedule to know what a major version means.
## References
- [Evolving the Node.js release schedule](https://nodejs.org/en/blog/announcements/evolving-the-nodejs-release-schedule)
- [Node.js previous releases and the support calendar](https://nodejs.org/en/about/previous-releases)
---
- **Page:** Preventing npm supply chain attacks
- **Source:** https://stijnvanhulle.be/blog/preventing-npm-supply-chain-attacks
- **Description:** How to evaluate npm packages, protect your install pipeline, and harden releases against supply chain attacks.
A new npm compromise lands every few weeks. The pattern is familiar: steal a maintainer's credentials, publish a poisoned version, and let the registry distribute it before anyone notices.
How one compromise reaches everyone
Phished maintainer
Poisoned version
npm registry
One stolen login publishes a poisoned version, and the registry pushes it to every install before a human catches it.
The [`chalk` and `debug` compromise](https://semgrep.dev/blog/2025/chalk-debug-and-color-on-npm-compromised-in-new-supply-chain-attack/) in September 2025 poisoned packages with 2.6 billion weekly downloads after a single maintainer fell for a 2FA-reset phishing email. The [Shai-Hulud worm](https://www.sysdig.com/blog/shai-hulud-the-novel-self-replicating-worm-infecting-hundreds-of-npm-packages) self-replicated across more than 500 packages, including `@ctrl/tinycolor` and CrowdStrike's, by stealing tokens at install time and republishing through them. The [Nx postmortem](https://nx.dev/blog/nx-console-v18-95-0-postmortem) in March 2026 chained into an [AWS admin takeover](https://thehackernews.com/2026/03/unc6426-exploits-nx-npm-supply-chain.html). The [Axios incident](https://www.microsoft.com/en-us/security/blog/2026/04/01/mitigating-the-axios-npm-supply-chain-compromise/) bypassed OIDC entirely by using a stolen npm token. And the [TanStack postmortem](https://tanstack.com/blog/npm-supply-chain-compromise-postmortem) covered a May 2026 sweep that used GitHub Actions cache poisoning to steal live OIDC tokens at publish time.
The defense has three layers: choose dependencies carefully, configure your install tooling, and protect your own release process.
## Do you need this dependency at all?
The cheapest attack to defend against is the one where you never install the package. Before you run `npm i`, `yarn add`, or `pnpm add`, ask whether you need the dependency. Could a few lines of local code solve the problem?
Then check the dependency footprint. A package that pulls in fifty others adds fifty more maintainers who could be phished. Fewer dependencies mean a smaller attack surface.
## Read the maintainers, not just the README
Open the GitHub repository and inspect the Commits tab. Filter out bot activity. A two-year gap followed by a sudden burst of releases can signal an abandoned package that changed hands, or an account takeover.
Look at who does the work. If almost every commit and release comes from one person, there is a concentration risk: one phished maintainer can compromise the whole project. A quiet year followed by several patch releases in one week deserves a closer look.
Check the latest release for a [provenance attestation](https://docs.npmjs.com/generating-provenance-statements). It ties the tarball to a specific commit, repository, and workflow run. A missing attestation does not prove a compromise, but an attacker without control of the repository cannot create a valid one.
## Watch out for slopsquatting
> Slopsquatting is a supply chain attack where hackers register fake, malicious software packages that AI models frequently hallucinate, tricking developers or AI agents into installing them.
AI coding assistants sometimes suggest package names that do not exist. Attackers register those names ahead of time, a practice called `slopsquatting` or `hallucination squatting`.
Any LLM-suggested package deserves a thirty-second sanity check: open it on [npm](https://www.npmjs.com), click through to the repo, and confirm the name maps to a real project.
## Installing
Once you decide to install a package, your package manager becomes the next line of defense. [pnpm 11](https://pnpm.io/supply-chain-security) includes defaults that `npm` does not, so this section focuses on `pnpm`.
- [`minimumReleaseAge`](https://pnpm.io/settings#minimumreleaseage) is the biggest single setting. pnpm 11 defaults to 1440 minutes, refusing any version published in the last day.
TIP
npm has its own [`min-release-age`](https://docs.npmjs.com/cli/v11/using-npm/config#min-release-age) setting for the same job, added in npm 11.10.0.
- [`strictDepBuilds`](https://pnpm.io/settings#strictdepbuilds) is the other one. On by default in pnpm 11, it means lifecycle scripts only run for packages you explicitly list in [`pnpm.onlyBuiltDependencies`](https://pnpm.io/package_json#pnpmonlybuiltdependencies). Keep the lockfile committed, and never run CI with `--no-frozen-lockfile`.
TIP
Npm does not have this, but you can set `--ignore-scripts` to disable all scripts.
In pnpm 11 these settings live in `pnpm-workspace.yaml`:
```yaml
# pnpm-workspace.yaml
minimumReleaseAge: 1440
minimumReleaseAgeStrict: true
onlyBuiltDependencies:
- esbuild
```
On npm, put the cooldown in `.npmrc`:
```ini
# .npmrc
min-package-age=72
ignore-scripts=true
```
## Publishing
If you publish to `npm`, you also need to protect your own releases from being hijacked.
- The biggest single change is dropping `NPM_TOKEN` and switching to [npm OIDC trusted publishing](https://docs.npmjs.com/trusted-publishers).
GitHub mints a short-lived token per workflow run and npm verifies the signature.
- OIDC is not a magic bullet. The token is short-lived, but it still sits in the runner during the job. TanStack got hit this way: attackers poisoned [Nx](https://nx.dev)'s GitHub Actions cache, the publish job restored it, and the malicious code read the live OIDC token. So treat the Actions cache as untrusted, and do not restore caches in the publish job.
- [Pin every action to a 40-character commit SHA](https://docs.github.com/en/actions/security-guides/security-hardening-for-github-actions#using-third-party-actions) (`actions/checkout@de0fac2e4500dabe0009e67214ff5f5447ce83dd # v6`) so a dependency cannot change under you between runs.
- Stage releases before they hit `latest`. `pnpm stage publish` (pnpm 11.3+) splits upload from promotion, which gives you a window to catch a bad release.
- Keep the publish job small. Run tests, lints, and installs on earlier jobs that do not have `id-token: write`. Every extra step inside the privileged job is one more place a token can leak. The publish job needs a couple of things, lifted from Kubb's [release.yml](https://github.com/kubb-labs/kubb/blob/eaef40b9aa6e5e9497811de1d5dd69df34179a1f/.github/workflows/release.yml):
```yaml
permissions:
contents: write
id-token: write
packages: write
env:
NPM_CONFIG_PROVENANCE: true
```
## Staged publishing
Without staging, a compromised CI runner publishes straight to the `latest` tag. The bad version reaches everyone running `npm install` or `pnpm i` within minutes. [Staged publishing](https://pnpm.io/cli/publish) breaks that path in two.
Staged publishing splits the path in two
Without staging
CI runner
latest tag
every install
Staged publishing
CI runner
staged version
2FA approval
latest tag
A stolen token publishes straight to latest without staging. With staging the release parks until a maintainer promotes it behind a 2FA prompt that never reaches the runner.
1. First, CI uploads. [`pnpm stage publish`](https://pnpm.io/cli/publish) signs the release and pushes it to [npm](https://www.npmjs.com) as a staged version that no one can install yet.
2. Second, a human promotes it. A maintainer reviews the staged version and moves it to `latest`, and [npm requires 2FA](https://docs.npmjs.com/configuring-two-factor-authentication) for that step.
That split is what saves you. An attacker who steals your tokens from a poisoned workflow still cannot promote the release. The 2FA prompt lands on your hardware key or authenticator, not the runner. The release sits in staging until someone with the key approves it, and that is your window to catch it and abort.
## The checklist
Before installing:
- Run the removal test. Do you actually need this package?
- Check maintainer count, release cadence, and time since the last real commit.
- Verify any LLM-suggested package name links to a real repo with provenance.
At install time:
- Use pnpm 11+ for the cooldown and the strict build allowlist.
- Set `minimumReleaseAgeStrict: true` and keep `pnpm.onlyBuiltDependencies` short.
- Install with `--ignore-scripts` wherever your tooling allows it.
When you publish:
- Enable OIDC trusted publishing and remove `NPM_TOKEN` from secrets.
- Set `NPM_CONFIG_PROVENANCE: true` in the publish job.
- Pin every action to a 40-character commit SHA.
- Do not restore GitHub Actions caches in the publish job.
- Stage releases via staged publishing before they hit `latest`.
- Turn on [two-factor auth with a hardware key](https://docs.npmjs.com/configuring-two-factor-authentication) on your npm account.
None of this stops a determined attacker forever. Layering these controls means one failure does not have to end in a poisoned release.
---
- **Page:** Rules, skills, commands, subagents, MCP
- **Source:** https://stijnvanhulle.be/blog/rules-skills-commands-subagents
- **Description:** How to split Claude Code guidance and tools so each part loads when you need it.
Most people put everything in [`CLAUDE.md`](https://docs.claude.com/en/docs/claude-code/memory) and wonder why the agent skips half of it. The file gets long, the model gets lazy, and the rules you actually cared about disappear into the noise.
The fix is to use the multiple building blocks in [Claude Code](https://docs.claude.com/en/docs/claude-code/overview). Four provide guidance. The fifth provides tools. Each loads differently and has a different cost.
## The five building blocks
## Rules: the always-on layer
Rules live in `.claude/rules/`. In my [agents plugin](https://github.com/stijnvanhulle/agents) that's eight files: `code style`, `JSDoc`, `markdown`, `plain language`, `security`, `testing`, `USA English`, `user questions`. They load on every turn, so they need to be short.
The test is simple. If forgetting it would produce code you'd reject in review, it's a rule. Everything else belongs elsewhere.
`security.md` is the cleanest example. Six bullets, no examples, no preamble. Don't commit secrets. Validate input at trust boundaries. Don't shell-interpolate untrusted strings. That's the whole file. It loads every turn because the cost of forgetting any one of them is too high.
Rules are not the place for linting or formatting. Spending context every turn to remind the agent about indentation or import order is wasteful when a tool checks it for free. Let [ESLint](https://eslint.org/) and [Oxlint](https://oxc.rs/docs/guide/usage/linter) catch lint violations and [Prettier](https://prettier.io/) or [oxfmt](https://oxc.rs/docs/guide/usage/formatter) handle formatting.
A rule does not have to load on every turn. Add a `paths` field to the frontmatter and it only loads when the agent touches a matching file, so a markdown rule stays out of context until there's markdown in play.
```yaml
---
paths:
- "**/*.md"
- "**/*.mdx"
---
```
## Skills: the reference shelf
[Skills](https://docs.claude.com/en/docs/claude-code/skills) are markdown files the agent loads only when the task matches. They can be long, because they only cost context when they fire.
My agents plugin has a `jsdoc` skill that loads when I write TypeScript. It carries the full tag taxonomy: which `@example` format to use, when `@default` and `@deprecated` apply, what tags to skip, and the order they go in. That's far too much to keep in context every turn, but exactly what I want on hand the moment I'm documenting a function. It costs nothing until the task triggers it.
The trigger lives at the top of `SKILL.md` as a short description. The agent reads the description on every turn but only opens the body when the task matches. That's the whole trick.
## Commands: workflows you type
[Commands](https://docs.claude.com/en/docs/claude-code/slash-commands) are skills you invoke by name with a slash. `/code-review`, `/verify`, `/changeset`. Same file format as a skill, different entry point.
Use them when you want the agent to do something specific on demand, and you don't want to retype the prompt every time. The `/create-pr` command in my agents plugin is a good example. It knows the project's conventions, runs the checks, and opens the pull request.
## Subagents: isolated workers
[Subagents](https://docs.claude.com/en/docs/claude-code/sub-agents) are different. They run in their own context window. Use one when you want parallel work, or when the task would flood your main context with noise.
`Explore` is the clearest example. If I ask it to find every place we read from `process.env`, it reads dozens of files and reports back two lines. My context stays clean.
The anti-pattern is reaching for a subagent when two tool calls would do. Spawning costs latency and tokens. Don't pay it unless the work is genuinely big or parallel.
## MCP servers: tools from outside
The first four building blocks are about guidance. [MCP servers](https://docs.claude.com/en/docs/claude-code/mcp) are different. They run as separate processes and expose tools the agent can call, like GitHub, a database, a browser, or your design system.
You wire one up once in `.mcp.json` or your user config, and the tools it provides show up alongside the built-in ones. I keep the GitHub MCP server enabled because almost every project needs PR comments and issue reads.
For codegen work I add the [Kubb MCP server](https://kubb.dev/docs/5.x/ai/mcp). It exposes [Kubb](https://kubb.dev/)'s code-generation tools to the agent, so it can trigger generation, validate a schema, and inspect the config straight from chat instead of me dropping out to the CLI.
The rule of thumb is the same as for subagents: don't add one until you actually need the capability. A server's tool names load at startup and the full schemas stay deferred until a tool is called, so with tool search on by default an idle server costs little. The reason to hold back is focus, not tokens. A long tool list gives the agent more ways to go sideways.
## A decision tree
Should every session enforce this? Rule.
Only when a specific task comes up? Skill.
Does the user trigger it explicitly? Command.
Does it need its own context window? Subagent.
Does it need to reach outside the repo? MCP server.
Which building block fits
Should every session enforce it?
yes →
Rule
Only when a specific task comes up?
yes →
Skill
Does the user trigger it explicitly?
yes →
Command
Does it need its own context window?
yes →
Subagent
Does it need to reach outside the repo?
yes →
MCP server
Walk down the rail. Each question that answers no falls through to the next.
## One feature, five touch points
Take "review this PR for security issues." It splits across all five building blocks.
The security rule is always on, so the agent already knows not to log secrets or trust input from the network. The code-review skill loads when the task is a review, bringing the project's reviewing conventions. The `/security-review` command from [Claude](https://claude.com/) lets me trigger the workflow with a slash. The code-reviewer subagent runs in isolation for a second opinion that won't pollute my main context. And the GitHub MCP server posts the inline comments back on the PR when the review is done.
Five building blocks, one feature, no overlap. Each piece earns its keep.
## Two more pieces that don't fit the list
These two work differently from the five above, but you will run into them.
[Hooks](https://docs.claude.com/en/docs/claude-code/hooks) are shell commands that run on set events, like `SessionStart` or `Stop`. They always run the same way, so they're not advice the agent can ignore. The template runs a `SessionStart` hook that installs dependencies, so the agent never burns a turn on `pnpm install`.
[Output styles](https://docs.claude.com/en/docs/claude-code/output-styles) change how the agent writes, not what it does. My agents plugin ships a `house` style with rules like "no em dashes, sentence-case headings, cut filler". It sets the voice for everything the agent says.
## Use the plugin
The rules, skills, commands, subagent, and output styles live in [stijnvanhulle/agents](https://github.com/stijnvanhulle/agents) and install as a plugin in any project. Run these in your terminal:
```bash
claude plugin marketplace add stijnvanhulle/agents
claude plugin install agents@stijnvanhulle
```
The plugin ships no hooks, so installing it won't run scripts in your repo. The [template](https://github.com/stijnvanhulle/template) keeps its own hooks under `.claude/`.
## Try it
Clone the [agents repo](https://github.com/stijnvanhulle/agents), open the folders side by side, and the structure is easy to follow. The [project page](https://stijnvanhulle.be/projects/agents) has a short overview of what's inside.
## References
- [Claude Code overview](https://docs.claude.com/en/docs/claude-code/overview)
- [Memory and `CLAUDE.md`](https://docs.claude.com/en/docs/claude-code/memory)
- [Skills](https://docs.claude.com/en/docs/claude-code/skills)
- [Slash commands](https://docs.claude.com/en/docs/claude-code/slash-commands)
- [Subagents](https://docs.claude.com/en/docs/claude-code/sub-agents)
- [MCP](https://docs.claude.com/en/docs/claude-code/mcp)
- [Hooks](https://docs.claude.com/en/docs/claude-code/hooks)
- [Output styles](https://docs.claude.com/en/docs/claude-code/output-styles)
- [My agents repo](https://github.com/stijnvanhulle/agents)
---
- **Page:** Agents
- **Source:** https://stijnvanhulle.be/projects/agents
- **Description:** Shared skills, rules, commands, subagents, and output styles for Claude Code, Cursor, and Codex, installable as a plugin.
## What it is
A shared toolset for AI coding agents. It ships skills for issue handling, branches,
changesets, changelogs, pull requests, documentation, and code cleanup. It also ships
convention rules, slash commands, a `code-reviewer` subagent, and Claude Code output styles.
Skills live in `.agents/skills/` in the open Agent Skills format. Thin adapters under
`tools/` expose the same source to Claude Code, Cursor, and Codex.
## Why I built it
I used the same rules and skills in every repository, and they drifted. One shared
repository keeps them in sync, so every project gets the same conventions and fixes.
## Install
```bash
# Claude Code
claude plugin marketplace add stijnvanhulle/agents
claude plugin install agents@stijnvanhulle
# Cursor
agent plugin marketplace add https://github.com/stijnvanhulle/agents
agent plugin install agents@stijnvanhulle
# Codex
codex plugin marketplace add stijnvanhulle/agents
codex plugin add agents@stijnvanhulle
```
Restart the client or start a new session after installing.
---
- **Page:** Kubb
- **Source:** https://stijnvanhulle.be/projects/kubb
- **Description:** Define your API once and Kubb generates TypeScript types, clients, hooks, validators, and mocks from an OpenAPI specification.
## What it is
Kubb is a framework for code generation. Define your API once with an OpenAPI or Swagger
specification, and Kubb generates the code around it: TypeScript types, clients,
data-fetching hooks, validators, and mock data. The core handles
parsing, the plugin graph, and file output, so each generator is a plugin you opt into
rather than a fixed pipeline.
## Why I built it
Hand-written API layers drift from the specification as soon as the back end changes.
Using the specification as the source of truth turns a renamed field or new endpoint into
a type error instead of a runtime surprise. The same specification can also drive types,
a React Query layer, Zod schemas, and Faker mocks from one config.
## Plugins
Kubb ships official plugins for TypeScript types, Axios and fetch clients, TanStack
Query for React and Vue, SWR, Zod validation, Faker mock data, and MSW handlers. An MCP
plugin exposes the generator to AI agents over the Model Context Protocol. You compose the
ones you need in a single `kubb.config.ts`, and the core resolves them into one generation
pass.
```bash
npx kubb generate
```
See the [documentation](https://www.kubb.dev) for the full plugin list and config
reference.
---
- **Page:** openapi-import
- **Source:** https://stijnvanhulle.be/projects/openapi-import
- **Description:** Import an OpenAPI spec in TypeScript like any other file, with types, autocomplete, and errors from the spec and no generated files.
`openapi-import` is a [TypeScript 7.1 content mapper](https://github.com/microsoft/typescript-go). Register it in `tsconfig.json`, then import a spec:
```ts
import type { Pet } from './petStore.openapi.yaml'
```
## Features
- Types straight from the spec, with no generated files.
- Works without a config: you get the types from [Kubb](https://stijnvanhulle.be/projects/kubb)'s `pluginTs`.
- Add a `kubb.config.ts` to get Zod schemas, clients and other plugin output from the same import.
- Autocomplete and type errors come from the spec.
- Go to definition, find references and hover jump between the types and the YAML.
- Rename a schema type and the key in the spec is renamed too.
- `tsc --runExternalCode` reports the same errors in CI.
- At run time, `unplugin-kubb` loads the same module in Vite, webpack, Rollup and other bundlers.
---
- **Page:** Scrum poker
- **Source:** https://stijnvanhulle.be/projects/scrum-poker
- **Description:** Planning poker cards for your phone, with rooms that put every vote, the story, and the team's questions on one shared screen.
## What it is
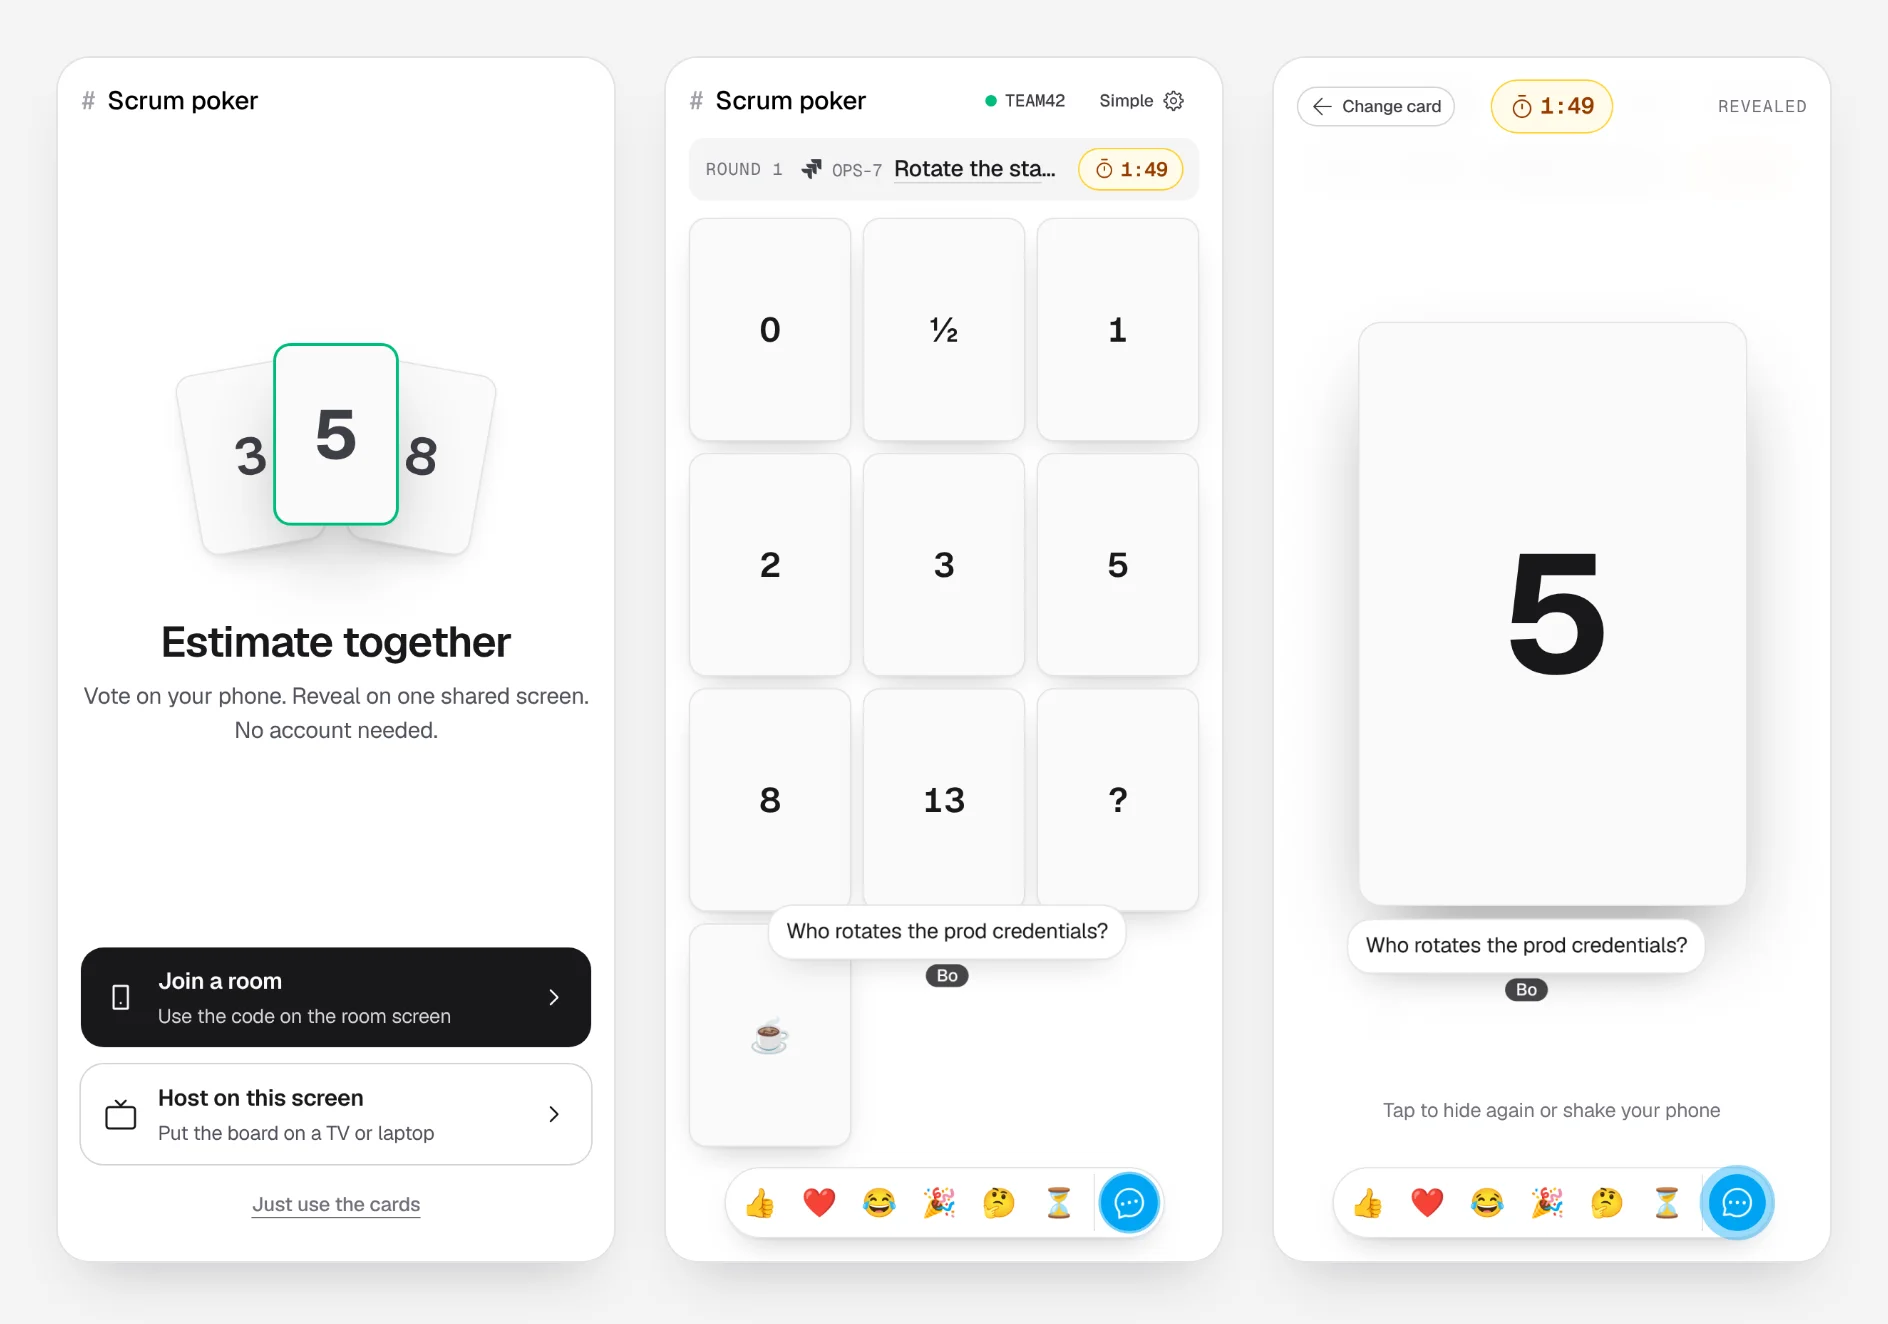
Planning poker cards in the browser. Use them on your own, or open a room and estimate with the whole team on one screen.
- Open [stijnvanhulle.be/scrum](https://stijnvanhulle.be/scrum) and tap a card. It stays face-down until you reveal it.
- Hold your phone up to the team, or join a room and vote on a shared screen.
- No account, nothing to install.
## The cards
- Four decks: Simple (0 to 13, the default), Standard (up to 100), Fibonacci (up to 89), and T-shirt sizes. Every deck has `?` and `☕`.
- In a room, the room screen picks the deck, so everyone votes on the same scale. On your own, you pick it in the settings.
- Tap a card and it grows into one big face-down card. Tap it or shake your phone to flip it. On a laptop, Space flips and Escape goes back.
- The page remembers your deck and your name for next time.
## Join a room
- On your first visit, pick **Join a room**, **Host on this screen**, or **Just use the cards**.
- To join, scan the QR code on the room screen, or enter its 6-character code and your name. Codes skip look-alike characters such as 0 and O.
- A dot next to the code shows the connection: green when connected, amber with a hint when the room can't be reached.
- Flipping your card face up shows it on the room screen too.
- A reaction bar (👍 ❤️ 😂 🎉 🤔 ⏳) floats your reaction up from your seat on every screen.
## Host a room
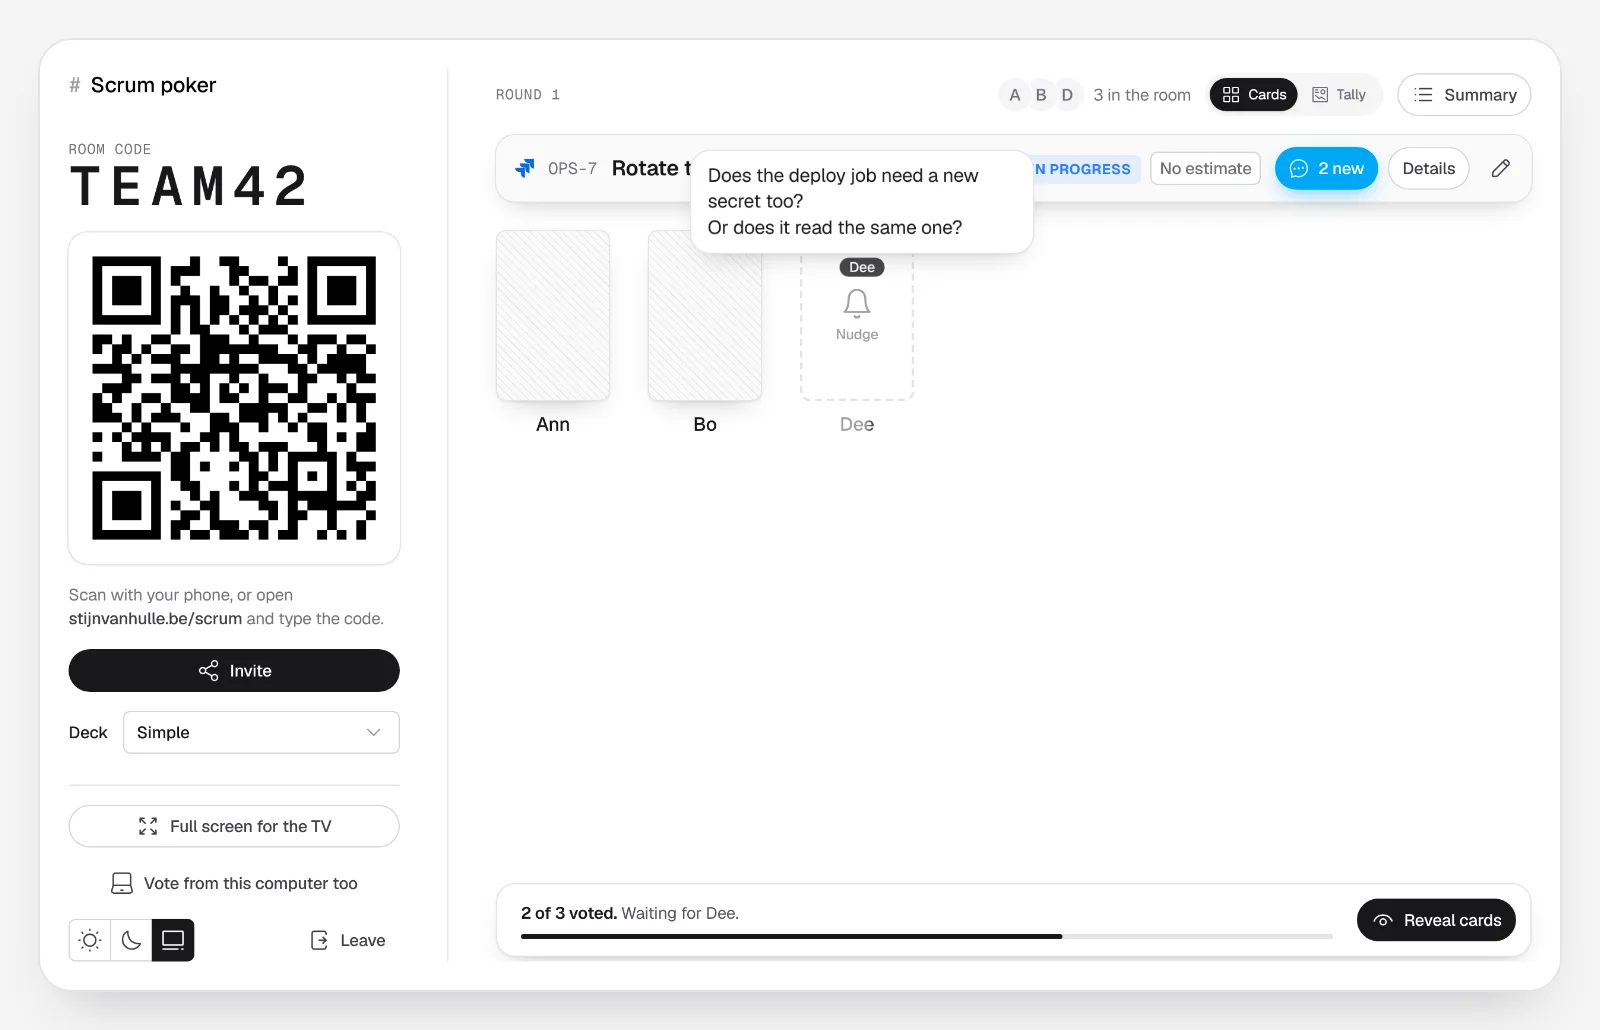
- Tap **Host on this screen** on a shared screen, such as the meeting-room TV. A side panel shows the code in big letters and, on a large screen, a QR code.
- **Invite** opens your share sheet. **Vote from this computer too** opens your own cards in a new tab, so you can host and vote from one laptop.
- **Deck** picks the scale every phone in the room votes with.
- **Full screen for the TV** moves the code, the QR code, and the timer into a header, so the board gets the whole width. There, the **⋯** menu holds the round summary, the deck, the theme, and **Leave room**.
- In a normal window, the panel button next to **Summary** hides the side panel once everyone has joined.
- Seats keep the order people joined in, so the order doesn't give the scores away.
- Tap **Nudge** on an empty seat to remind that player. Their phone buzzes and asks for a vote.
- Switch between the **Cards** view, one card per seat, and the **Tally** view, with the votes per score, the average, and the spread.
## The reveal
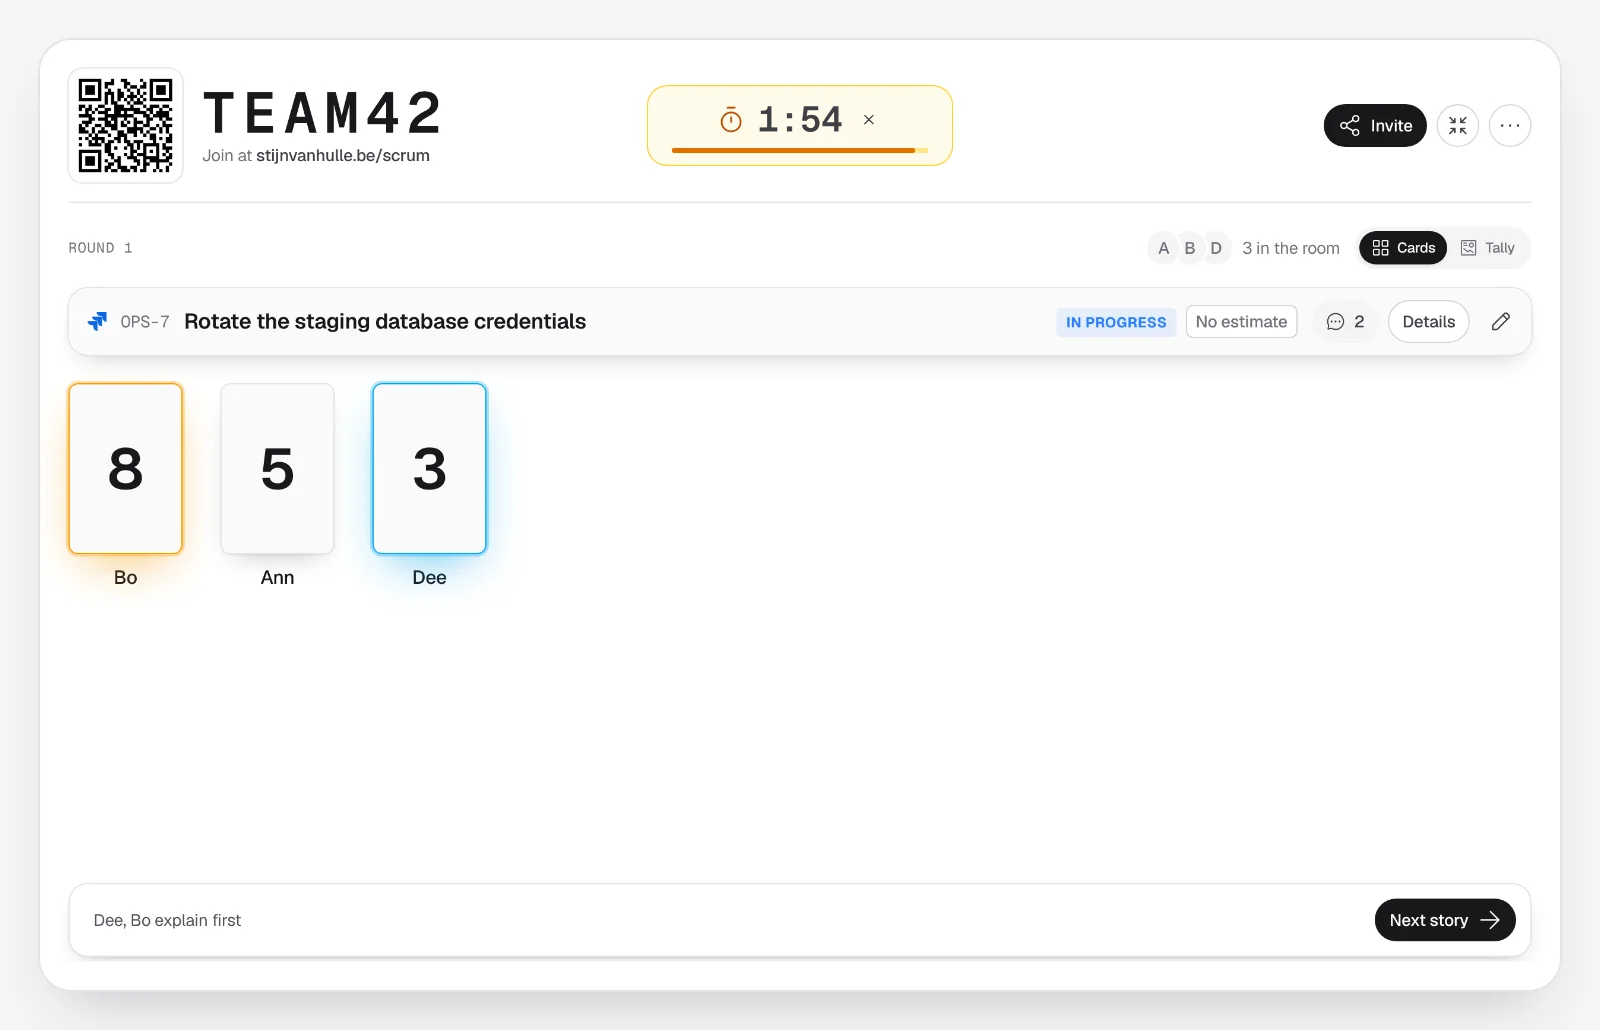
- The bar at the bottom says who the board still waits for. Tap **Reveal cards** for a 3-2-1 countdown. When everyone has voted, the countdown starts on its own.
- Once the countdown starts, votes are locked. Phones can't change or flip their card until the next story.
- When everyone agrees, the screen flashes green and cards burst out as confetti.
- When the votes split, the lowest card turns blue and the highest amber, and the board names who explains first.
- **Discuss** starts a 2-minute timer at the top of the room screen and every phone. The arrow next to it picks 1, 3, 5, or 10 minutes instead, and the room screen remembers your pick. Phones buzz when time is up.
- **Next story** clears the board and sends every phone back to the deck. It's there during voting too, to skip a story.
## The story on screen
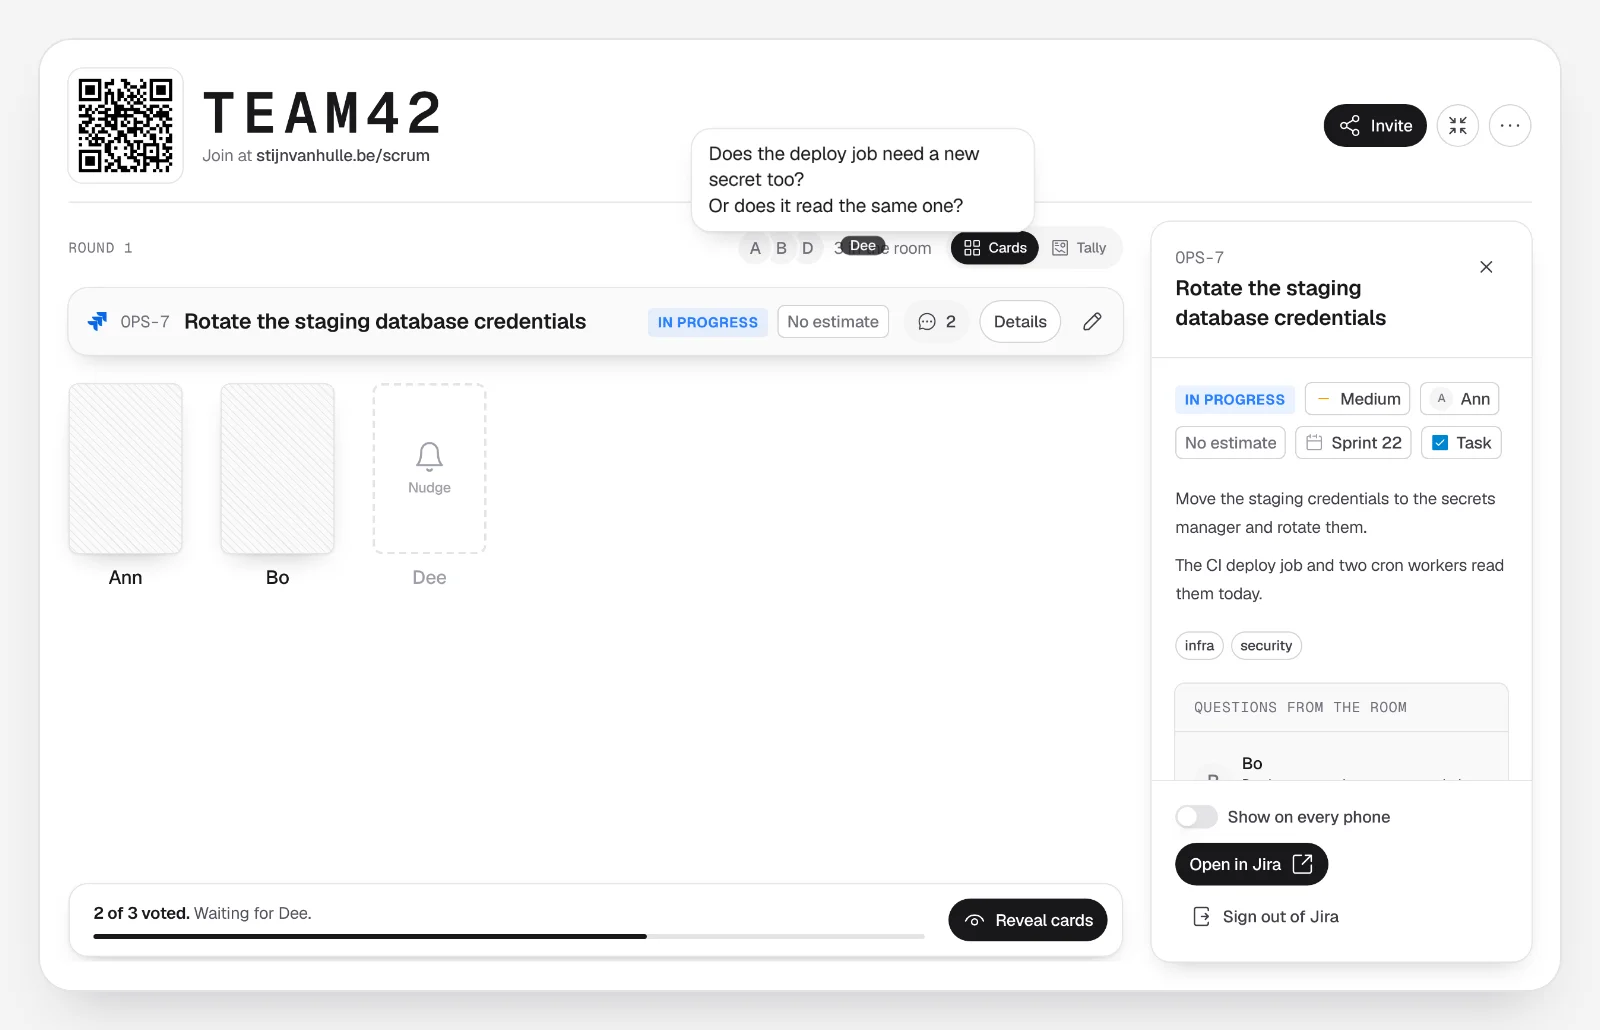
- Type a story name, or paste a Jira or Linear issue link. Sign in on the shared screen to pull in the title, status, and description. Phones never sign in.
- A loaded issue takes one line: its key, title, status, and estimate. **Details** opens the description and the questions in a panel beside the board, and the panel can stay open while the team votes. The pencil changes the story.
- After the reveal, the board says whether the vote matches the estimate already on the issue.
- **Save 5 to OPS-7** writes the estimate back to Jira's story points or Linear's estimate. After a split vote it
offers the middle vote, and the arrow next to it picks another card, with who voted each.
- **Show on every phone**, in the details panel, opens the story on every phone at once.
- Anyone can ask a question from the chat button on their phone. It stays with the story for that round.
## Round summary
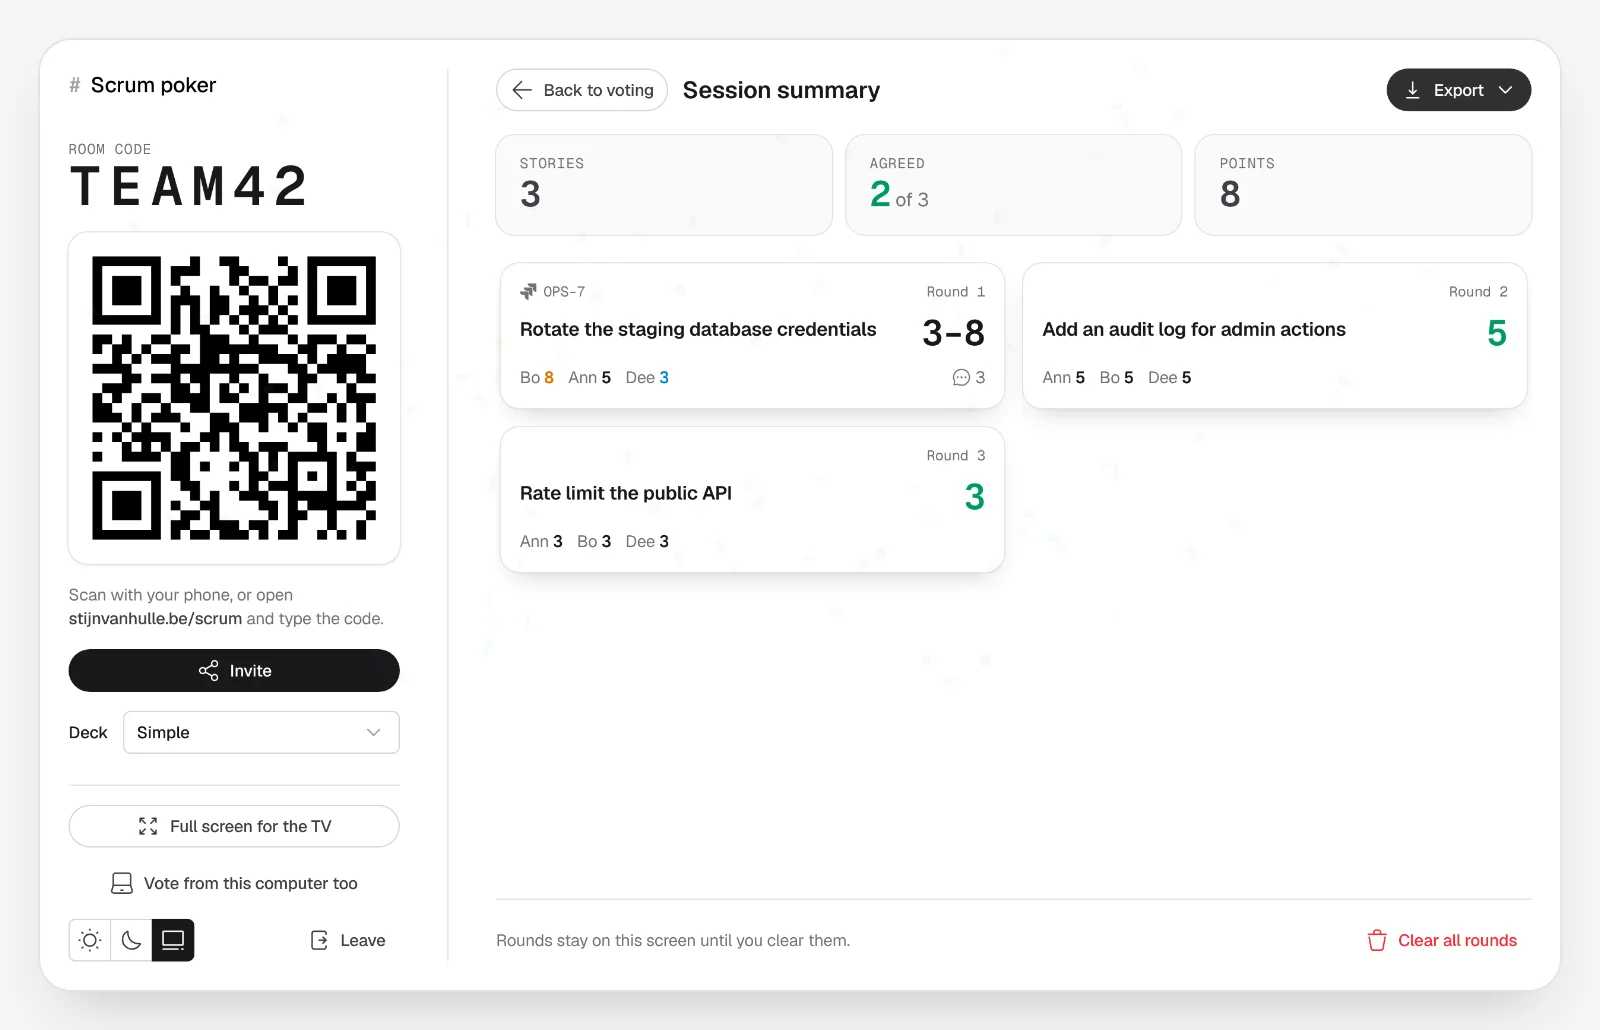
- Every reveal is saved as a round. **Summary** shows each round with its estimate, the votes, and the questions. In full screen, it's **Round summary** in the **⋯** menu.
- The summary counts the rounds that reached consensus and adds up the agreed and saved points.
- Type the sprint's capacity in the summary and it shows how many points are left. The board shows the same total as a
chip, and both turn amber when the sprint holds more than fits.
- **Confidence vote** ends planning: every phone gets the cards 1 (No chance) to 5 (Certain), and after the reveal the
board names whoever voted 2 or lower, so the team hears them out before it commits.
- **Export** copies the stories and their estimates as a list or a Markdown table, or downloads them as a CSV file.
## Small details
- Phones buzz when the board reveals and when a new round starts. iPhones don't support vibration, so they stay quiet.
- Add it to your home screen and it opens full screen with its own icon.
- Turn on reduced motion in your system settings and every animation stops.
## How it works
- Phones talk straight to the shared screen over WebRTC, using [Trystero](https://github.com/dmotz/trystero). Public Nostr relays only help the devices find each other.
- When a firewall or a 4G network blocks the direct connection, a relay server passes the messages on.
- On your own, every pick stays on your device.
## Why I built it
Estimation sessions need cards. I wanted a set that opens without an account, that the whole team can follow on one shared screen, and that keeps the story in view while we vote.
---
- **Page:** Template
- **Source:** https://stijnvanhulle.be/projects/template
- **Description:** A TypeScript monorepo starter with pnpm workspaces, Turborepo, oxlint, oxfmt, tsdown, Vitest, Changesets, and CI.
## What it is
A TypeScript monorepo starter. Fork it, update a few fields, and you get a repository
with build, test, lint, format, release, and CI workflows.
## Why I built it
I kept copying the same configuration between repositories: the linter, formatter, test
runner, release flow, and CI workflow. This template puts that setup in one repository so
the projects I build stay consistent.
## Tooling
[pnpm](https://pnpm.io) workspaces and [Turborepo](https://turborepo.com) run the
monorepo. [oxlint](https://oxc.rs) and [oxfmt](https://oxc.rs) handle linting and
formatting, [tsdown](https://tsdown.dev) builds the packages, and
[Vitest](https://vitest.dev) runs the tests with coverage reported to
[Codecov](https://about.codecov.io). A
[GitHub Actions](https://github.com/features/actions) workflow runs lint, type-check, and
test on every push.
Releases go through [Changesets](https://github.com/changesets/changesets): add a
changeset, and when it lands on `main` a release workflow opens a Version Packages PR that
publishes the affected packages to [npm](https://www.npmjs.com) with provenance.
Dependency upgrades run through [taze](https://github.com/antfu-collective/taze) with a
three-day maturity period, so new releases soak before they land.
## Set up for AI agents
`AGENTS.md` is the canonical instruction file, and `AGENT.md` is a symlink to it, so every
tool reads from one source instead of drifting copies.
[Claude Code](https://claude.com/claude-code), [Codex](https://github.com/openai/codex),
[Copilot](https://github.com/features/copilot), [Cursor](https://cursor.com),
[Gemini](https://github.com/google-gemini/gemini-cli), and other AGENTS.md runtimes all read
from it. Hooks under `.claude/` install dependencies and format on edit.
Shared skills, rules, commands, and subagents live in a separate project,
[agents](https://stijnvanhulle.be/projects/agents).
## Start a new project
```bash
gh repo create my-project --template stijnvanhulle/template
```
Fork it, update the package fields, and start writing code.